Debugging and Profiling in Visual Studio 2013

Thu, July 18, 2013, 08:51 AM under VisualStudio

The recently released Visual Studio 2013 Preview includes a boat-load of new features in the diagnostics space, that my team delivered (along with other teams at Microsoft). I enumerated my favorites over on the official Visual Studio blog so if you are interested go read the list and follow the links:

Visual Studio 2013 Diagnostics Investments


asynchrony is viral

Mon, February 4, 2013, 07:46 PM under VisualStudio

It is becoming hard to write code today without introducing some form of asynchrony and, if you are using .NET (e.g. for Windows Phone 8 or Windows Store apps), that means sooner or later you have to await something and mark your method as async.

My most recent examples included introducing speech recognition in my Translator By Moth phone app where I had to await mySpeechRecognizerUI.RecognizeWithUIAsync() and when moving that code base to a Windows Store project just to show a MessageBox I had to await myMessageDialog.ShowAsync().

Any time you need to invoke an asynchronous method in your code, you have a choice to make: kick off the operation but don’t wait for it to complete (otherwise known as fire-and-forget), synchronously wait for it to complete (which will entail blocking, which can be bad, especially on a UI thread), or asynchronously wait for it to complete before continuing on with the rest of the method’s work. In most cases, you want the latter, and the await keyword makes that trivial to implement. 

When you use the magical await keyword in front of an API call, then you typically have to make additional changes to your code:

  1. This await usage is within a method of course, and now you have to annotate that method with async.
  2. Furthermore, you have to change the return type of the method you just annotated so it returns a Task (if it previously returned void), or Task<myOldReturnType> (if it previously returned myOldReturnType). Note that if it returns void, in some cases you could cheat and stop there.
  3. Furthermore, any method that called this method you just annotated with async will now also be invoking an asynchronous operation, so you have to make that change in the body of the caller method to introduce the await keyword before the call to the method.
  4. …you guessed it, you now have to change this caller method to be annotated with async and have its return types tweaked...
  5. …and it goes on virally…

At some point you reach the root of your user code, e.g. a GUI event handler, and whoever calls that void method can already deal with the fact that you marked it as async and the viral introduction of the keywords stops there… This is all wonderful progress and a very powerful mechanism, and I just wish someone had written a refactoring tool to take care of this… anyone?

I mentioned earlier that you have a choice when invoking an asynchronous operation. If the first time you encounter this you wish to localize the impact of all these changes and essentially try to turn the asynchronous behavior into synchronous by blocking - don't! For reasons why you don't want to do that, read Toub's excellent blog post (and check out the rest of his blog with gems on async programming starting with the Async FAQ). Just embrace the pattern knowing that when you use one instance of an await, you'll propagate the change all the way to the root user code method, e.g. typically an event handler.

Related aside: I just finished re-writing my MessageBox wrapper class for Phone projects, including making it work in Windows Store projects, and it does expect you to use it with an await :-). I'll share that in an upcoming post for those of you that have the same need…


Visual Studio Continued Excitement

Sun, September 23, 2012, 10:45 PM under Personal | VisualStudio

As you know Visual Studio 2012 RTM’d and then became available in August (Soma’s blog posts told you that here and here), and the VS2012 launch was earlier this month (Soma also told you that here). Every time a release of Visual Studio takes place I am very excited, since this has been my development tool of choice for almost my entire career (from many years before I joined Microsoft). I am doubly excited with this release since it is the second version of Visual Studio that I have worked on and contributed major features to, now that I’ve been in the developer division (DevDiv) for over 4 years.

Additionally, I am very excited about the new era that VS2012 starts with VSUpdate for continued customer value: instead of waiting for the next major version of VS to get new features, there is new infrastructure to enable friction-free updates. The first update will ship before the end of this year, and you can read more about it at Brian’s blog post. I also noticed that a CTP of the first quarterly update is available to download here.

In the last two months, the VS2012 family of products we all worked on in DevDiv shipped, coinciding with the end of the Microsoft financial/review year, and naturally followed by a couple of organizational changes (e.g. see Jason’s blog post)… On a personal level, this meant that I was very lucky to have an opportunity present itself to me that I simply could not turn down, so I grabbed it! I’ll still be working on Visual Studio, but not in the Parallel Computing part of the C++ team; instead I will be PM-leading the VS Diagnostics team… Stay tuned for details of what is coming in that space, in the VS updates and in the next major VS release, as I am able to share them…


Visual Studio Exceptions dialogs

Tue, May 1, 2012, 07:03 PM under VisualStudio

Previously I covered step 1 of live debugging with start and attach. Once the debugger is attached, you want to go to step 2 of live debugging, which is to break.

One way to break under the debugger is to do nothing, and just wait for an exception to occur in your code. This is true for all types of code that you debug in Visual Studio, and let's consider the following piece of C# code:

3:  static void Main()
4:  {
5:    try
6:    {
7:      int i = 0;
8:      int r = 5 / i;
9:    }
10:    catch (System.DivideByZeroException) {/*gulp. sue me.*/}
11:    System.Console.ReadLine();
12: }

If you run this under the debugger do you expect an exception on line 8? It is a trick question: you have to know whether I have configured the debugger to break when exceptions are thrown (first-chance exceptions) or only when they are unhandled. The place you do that is in the Exceptions dialog which is accessible from the Debug->Exceptions menu and on my installation looks like this:

image

Note that I have checked all CLR exceptions. I could have expanded (like shown for the C++ case in my screenshot) and selected specific exceptions. To read more about this dialog, please read the corresponding Exception Handling debugging msdn topic and all its subtopics.

So, for the code above, the debugger will break execution due to the thrown exception (exactly as if the try..catch was not there), so I see the following Exception Thrown dialog:

image

Note the following:

  1. I can hit continue (or hit break and then later continue) and the program will continue fine since I have a catch handler.
  2. If this was an unhandled exception, then that is what the dialog would say (instead of first chance exception) and continuing would crash the app.
  3. That hyperlinked text ("Open Exception Settings") opens the Exceptions dialog I described further up.
  4. The coolest thing to note is the checkbox - this is new in this latest release of Visual Studio: it is a shortcut to the checkbox in the Exceptions dialog, so you don't have to open it to change this setting for this specific exception - you can toggle that option right from this dialog.

Finally, if you try the code above on your system, you may observe a couple of differences from my screenshots. The first is that you may have an additional column of checkboxes in the Exceptions dialog. The second is that the last dialog I shared may look different to you. It all depends on the Debug->Options settings, and the two relevant settings are in this screenshot:

image

The Exception assistant is what configures the look of the UI when the debugger wants to indicate exception to you, and the Just My Code setting controls the extra column in the Exception dialog. You can read more about those options on MSDN: How to break on User-Unhandled exceptions (plus Gregg’s post) and Exception Assistant.

Before I leave you to go play with this stuff a bit more, please note that this level of debugging is now available for JavaScript too, and if you are looking at the Exceptions dialog and wondering what the "GPU Memory Access Exceptions" node is about, stay tuned on the C++ AMP blog ;-)


Start Debugging in Visual Studio

Thu, March 15, 2012, 07:05 PM under VisualStudio

Every developer is familiar with hitting F5 and debugging their application, which starts their app with the Visual Studio debugger attached from the start (instead of attaching later). This is one way to achieve step 1 of the Live Debugging process.

Hitting F5, F11, Ctrl+F10 and the other ways to start the process under the debugger is covered in this MSDN "How To".

The way you configure the debugging experience, before you hit F5, is by selecting the "Project" and then the "Properties" menu (Alt+F7 on my keyboard bindings). Dependent on your project type there are different options, but if you browse to the Debug (or Debugging) node in the properties page you'll have a way to select local or remote machine debugging, what debug engines to use, command line arguments to use during debugging etc.

Currently the .NET and C++ project systems are different, but one would hope that one day they would be unified to use the same mechanism and UI (I don't work on that product team so I have no knowledge of whether that is a goal or if it will ever happen). Personally I like the C++ one better, here is what it looks like (and it is described on this MSDN page):

image

If you were following along in the "Attach to Process" blog post, the equivalent to the "Select Code Type" dialog is the "Debugger Type" dropdown: that is how you change the debug engine.

Some of the debugger properties options appear on the standard toolbar in VS. With Visual Studio 11, the Debug Type option has been added to the toolbar

image

If you don't see that in your installation, customize the toolbar to show it - VS 11 tends to be conservative in what you see by default, especially for the non-C++ Visual Studio profiles.


Attach to Process in Visual Studio

Thu, March 15, 2012, 01:51 PM under VisualStudio

One option for achieving step 1 in the Live Debugging process is attaching to an already running instance of the process that hosts your code, and this is a good place for me to talk about debug engines.

You can attach to a process by selecting the "Debug" menu and then the "Attach To Process…" menu in Visual Studio 11 (Ctrl+Alt+P with my keyboard bindings), and you should see something like this screenshot:

clip_image001

I am not going to explain this UI, besides being fairly intuitive, there is good documentation on MSDN for the Attach dialog.

I do want to focus on the row of controls that starts with the "Attach to:" label and ends with the "Select..." button. Between them is the readonly textbox that indicates the debug engine that will be used for the selected process if you click the "Attach" button. If you haven't encountered that term before, read on MSDN about debug engines.

Notice that the "Type" column shows the Code Type(s) that can be detected for the process. Typically each debug engine knows how to debug a specific code type (the two terms tend to be used interchangeably). If you click on a different process in the list with a different code type, the debug engine used will be different. However note that this is the automatic behavior. If you believe you know best, or more typically you want to choose the debug engine for a process using more than one code type, you can do so by clicking the "Select..." button, which should yield a "Select Code Type" dialog like this one:

image

In this dialog you can switch to the debug engine you want to use by checking the box in front of your desired one, then hit "OK", then hit "Attach" to use it.

Notice that the dialog suggests that you can select more than one. Not all combinations work (you'll get an error if you select two incompatible debug engines), but some do. Also notice in the list of debug engines one of the new players in Visual Studio 11, the GPU debug engine - I will be covering that on the C++ AMP team blog (and no, it cannot be combined with any others in this release).


Visual Studio 11 not 2011

Wed, February 8, 2012, 10:16 PM under VisualStudio

A little pet peeve of mine is when people incorrectly refer to the Developer Preview (or the upcoming Beta) as Visual Studio 2011 instead of the correct Visual Studio 11.

The "11" refers to the version number (internally we call it Dev11). What the product will be called when it is released is anyone's guess (it could keep the name or it could have a year appended to it, or it could be something else, who knows). Even if it does have a year appended to the name, I think it is a safe bet it won't be last year!

For reference, version 10 was the previous version of Visual Studio which happened to be released in 2010, hence it got the name Visual Studio 2010. That is what confuses new people to this product I guess... they think that the two-digit number matches the year, just because it coincided like that last year. (btw, internally we called it Dev10).

For further reference, older releases were: Visual Studio 2008 (v9) aka "Orcas", Visual Studio 2005 (v8) aka "Whidbey", Visual Studio .NET 2003 (v7.1) aka "Everett", and Visual Studio .NET 2002 (v7) aka "Rainier". Before that, we were in the pre-.NET era with Visual Studio 6 (where the version and the product name matched, without the year appended to the name).

So next time you hear someone saying "Visual Studio 2011", point them to this post for some mini-education... thanks.


GPU Debugging with VS 11

Tue, September 20, 2011, 07:21 PM under GPGPU | ParallelComputing | VisualStudio

BELOW IS OUTDATED INFORMATION, PLEASE SEE MY UPDATED POST ON OUR TEAM BLOG:

http://blogs.msdn.com/b/nativeconcurrency/archive/2012/03/17/start-gpu-debugging-in-visual-studio-11.aspx

---

With VS 11 Developer Preview we have invested tremendously in parallel debugging for both CPU (managed and native) and GPU debugging. I'll be doing a whole bunch of blog posts on those topics, and in this post I just wanted to get people started with GPU debugging, i.e. with debugging C++ AMP code.

First I invite you to watch 6 minutes of a glimpse of the C++ AMP debugging experience though this video (ffw to minute 51:54, up until minute 59:16). Don't read the rest of this post, just go watch that video, ideally download the High Quality WMV.

Summary

GPU debugging essentially means debugging the lambda that you pass to the parallel_for_each call (plus any functions you call from the lambda, of course). CPU debugging means debugging all the code above and below the parallel_for_each call, i.e. all the code except the restrict(direct3d) lambda and the functions that it calls. With VS 11 you have to choose what debugger you want to use for a particular debugging session, CPU or GPU. So you can place breakpoints all over your code, then choose what debugger you want (CPU or GPU), and you'll only be able to hit breakpoints for the code type that the debugger engine understands – the remaining breakpoints will appear as unbound. If you want to hit the unbound breakpoints, you'd have to stop debugging, and start again with the other debugger. Sorry. We suck. We know. But once you are past that limitation, I think you'll find the experience truly rewarding – seriously!

Switching debugger engines

With the Developer Preview bits, one way to switch the debugger engine is through the project properties – see the screenshots that follow.

This one is showing the CPU option selected, which is basically the default that you are all familiar with:

image

This screenshot is showing the GPU option selected, by changing the debugger launcher (notice that this applies for both the local and remote case):

image

You actually do not have to open the project properties just for switching the debugger engine, you can switch the selection from the toolbar in VS 11 Developer Preview too – see following screenshot (the effect is the same as if you opened the project properties and switched there)

image

Breakpoint behavior

Here are two screenshots, one showing a debugging session for CPU and the other a debugging session for GPU (notice the unbound breakpoints in each case)

image

…and here is the GPU case (where we cannot bind the CPU breakpoints but can the GPU breakpoint, which is actually hit)

image

Give C++ AMP debugging a try

So to debug your C++ AMP code, pull down the drop down under the 'play' button to select the 'GPU C++ Direct3D Compute Debugger' menu option, then hit F5 (or the 'play' button itself). Then you can explore debugging by exploring the menus under the Debug and under the Debug->Windows menus. One way to do that exploration is through the C++ AMP debugging walkthrough on MSDN.

Another way to explore the C++ AMP debugging experience, you can use the moth.cpp code file, which is what I used in my BUILD session debugger demo. Note that for my demo I was using the latest internal VS11 bits, so your experience with the Developer Preview bits won't be identical to what you saw me demonstrate, but it shouldn't be far off.

Stay tuned for a lot more content on the parallel debugger in VS 11, both CPU and GPU, both managed and native.


Links to C++ AMP and other content

Fri, September 16, 2011, 10:00 PM under GPGPU | Links | ParallelComputing | VisualStudio | Windows

A few links you may be interested in.


Visual Studio 2010 released!

Mon, April 12, 2010, 08:07 AM under ParallelComputing | VisualStudio

Visual Studio 2010 releases to the world today. Get the full story from Soma's blog post (inc. links for buy, try etc).

Our team is very proud of what we have contributed to this release and you can learn more about it through our content on the Parallel Computing MSDN home.


Extension Manager in Visual Studio 2010

Tue, November 10, 2009, 10:36 AM under VisualStudio
One of the powerful aspect of Visual Studio is its ability to be extended and many people do that. You can find numerous extensions at the Visual Studio Gallery. The VSX team links to a 4-part blog series on how to create and share templates. You can also look find extension examples on the vsx code gallery.

With Visual Studio 2010, you can search for items and install them directly from within Visual Studio's new Extension Manager. You launch it from the Tools menu:


When the dialog comes up, be sure to explore the various actionable areas on the left and also note the search on the right. For example, I typed "MP" and it quickly filtered the list to show me the MPI Project Template:


Others have written about this before me, just bing Extension Manager (and note that Beta2 introduced changes, some of which you can witness in the screenshot above).

Core debugger enhancements in VS2010

Mon, November 9, 2009, 07:15 PM under VisualStudio
Since my team offers "parallel debugging", we refer to the team delivering all the other debugging features as the "core debugger" team. They have published a video of new VS2010 debugger features that I encourage you to watch to find out about enhancements with DataTips, breakpoints, dump debugging (inc. IL interpreter) and Threads window.

The raw list of features with short description is also here.

Instructions for collecting dumps in VS2010

Thu, October 29, 2009, 07:11 PM under VisualStudio
Came across this on an internal email thread and thought it would be useful to share, in case you run into a VS crash and wish to collect the information needed by Microsoft support.

1. Start 2 instances of Visual Studio 2010 (devenv.exe).
2. In the first one select Tools -> Attach to Process.
3. Click the Select button for “Attach to:” and select Managed and Native.
4. Select the other devenv from the list and click Attach.
5. Switch to the other devenv.
6. Load your solution and try to reproduce the crash.
7. When you hit the crash the debugger should automatically break.
8. Select Debug -> Save Dump As, then set the type to minidump with heap and save the file to a location with lot’s of space.

Note: If you are running the VB profile you will not see the Save Dump As menu item. To add this menu item:
a. Select Tools -> Customize
b. Select the Commands tab
c. Select Debug from the “Menu bar” dropdown
d. Click “Add Command…”
e. Select Debug from the Categories list.
f. Find the “Save Dump As” entry in the Commands window.
g. Click OK (the “Save Dump As…” command is added to the top of the Debug menu).
h. Click “Close”

Window Positions in Visual Studio

Tue, October 20, 2009, 05:04 PM under VisualStudio
There are many toolwindows in Visual Studio and each release keeps adding new ones. This is great for offering more features and increasing productivity, but it also adds to the number of windows we need to manage and it makes it even more important to understand how the positioning works in VS (and most of this applies to toolbars as well).

The first important thing to understand is that there are 3 different window configurations persisted per user on the machine.
1. The standard configuration: the default when you open a solution in Visual Studio.

2. The debugging configuration: the one when you hit F5 (and a little window earthquake takes place while everything readjusts).

3. The often forgotten, full screen configuration when you hit Shift+Alt+Enter, in any of the previous configurations


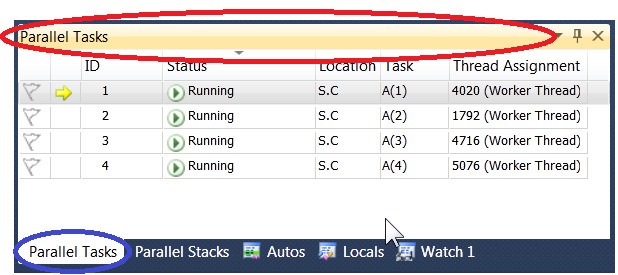
Once you understand the above, you should never utter the words: "didn't I just close that window, why did it come back", which we typically hear from presenters on stage after hiding, for example, Solution Explorer and then when they hit F5 it comes back. You need to hide (or otherwise position) each window for every one of the 3 configurations if you really want it to be like that all the time. Another example is if you decide to move the Breakpoints window in standard configuration, don't be surprised if it pops up somewhere else when you debug: to make sure it appears at the same place always, you need to move it to where you want in all configurations. Understanding the above also means that you won’t be looking for the Parallel Tasks window when in standard configuration since it is a debugging window and hence applicable only when in debugging mode. I hope the point is made.

The second most important thing to understand is that each window has a default position for each one of the configurations. Those default positions are different per profile that you chose the first time you run Visual Studio. Just because you have some defaults, it doesn't mean you need to stick with them, so choose what is best for you.

So what are the two basic choices we make per window?
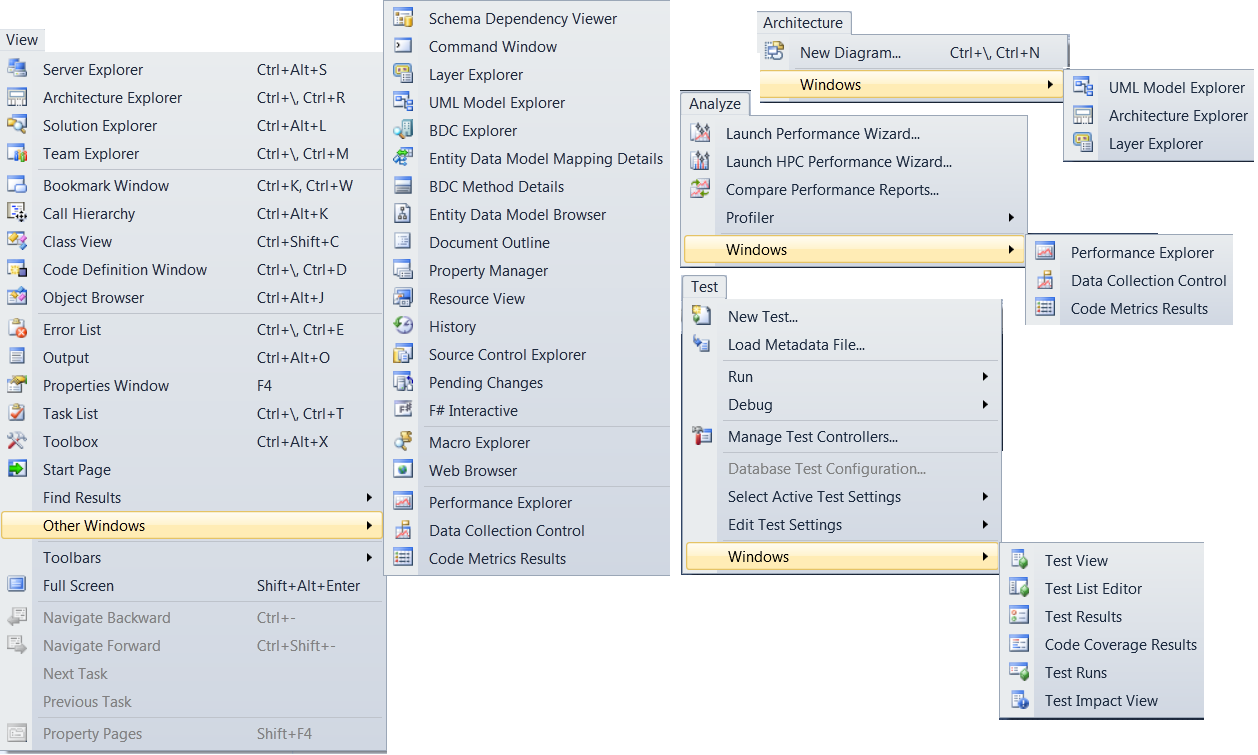
A. Is it hidden or visible. If it is hidden, we should at least know where it lives on the menus so we can bring it up when we need it (and thus avoid the "out of sight, out of mind" pitfall). So go ahead and explore all the menus under the View menu and don't forget the ones under Architecture, Test and Analyze:

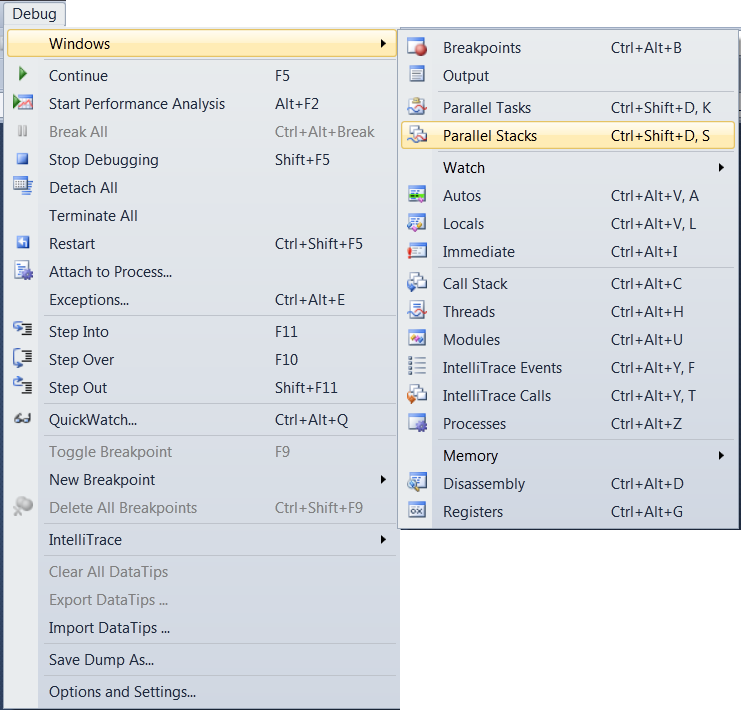
Don't forget that menu options change when you are in debugging mode, so explore the Debug menu once you've hit a breakpoint:

TIP: If you are not familiar with all of these windows above, maybe you are not the VS power user you thought you were ;-)

B. If you've opened a window, it has a default position that each profile team chose. You need to decide where it lives: floating (this is usually a temporary state or used on the secondary monitor, combined with MAX options), docked to the left/right/top/bottom (further decision if it is pinned or autohides controlled via the pushpin) or even docked to the center as a tabbed document (see the drop down options in the screenshot of the link).

With regards to moving a window around for docking I often observe people fighting the IDE, especially since each docking target can have multiple side-by-side groups. It is quite simple. Drag the window towards your desired area and look out for blue shaded region to appear, it represents where your window will go: if you like that position then you can release the mouse button; if you don't, keep moving the window. Along with the blue shadowed region, you also get some arrow targets appearing that you can drag the mouse pointer over (while still keeping the mouse button down so as not to release the window). Here is a screenshot of dragging the Parallel Stacks window towards the top and moving the mouse over the left arrow box that appeared.

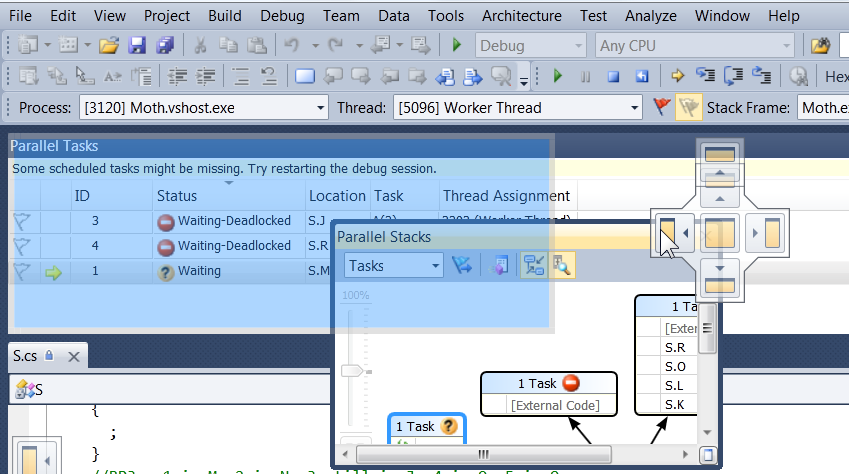
After this screenshot was taken I released the mouse button and a new window group was created next to the Parallel Tasks window that was occupied by the Parallel Stacks window. If I wanted it to join the same group as the Parallel Tasks window, I would have dragged towards the middle box and released then.

TIP: if you want to drag a window out of its group to floating, don't drag it by the title bar, but instead drag it from its tab. I.e. in the following screenshot, dragging from the title bar (red circle) will float the entire window group whereas dragging from the tab (blue circle) will float just the Parallel Tasks window.


Finally, you can backup and restore the window layouts via the Tools-> Import and Export Settings menu. FYI, they are stored on your machine in this folder: "%userprofile%\AppData\Roaming\Microsoft\VisualStudio\9.0". Look for the windows.prf and windowsidx.prf files. I found that via this msdn link.

Visual Studio 2010 Beta2 (build 21006)

Mon, October 19, 2009, 09:11 AM under VisualStudio
MSDN Subscribers can download Visual Studio 2010 Beta2 today with general public availability to follow in a couple of days. Official blog posts by Soma.

I have been using this since October 8th (2 days after it was built as you can tell from the build number) and it is amazingly better than the Beta1 in terms of performance, stability and new features too. It is worthy of its "go-live" license.


More posts to follow from me on VS2010; for now, I just updated the VS Profile screenshot and the Parallel Debugging content.

Visual Studio Profile

Fri, October 9, 2009, 04:51 PM under VisualStudio
Visual Studio 2005 introduced the concept of profiles (which still exists in VS2008 and VS2010). You first experience that through the annoying dialog you see the first time you launch VS asking to bucket yourself into one of General, Project Management, VB, C#, C++, F# and Web.

TIP: Click on each one of the options in the list to read the description on the right that gives insight into what will happen.

Once you choose your label, you get default settings that the product teams decided around default window & toolbar layouts, order of choices in the New Project dialog, menu configurations and keyboard shortcuts.

I guess I was used to the configurations of VS.NET 2002 and VS.NET 2003 so I did not embrace this VS2005 feature. FYI, I always pick General, which largely represents the settings that the early version of Visual Studio had and the one that caters better for developers programming in more than one language.

The profile concept gives the product teams the power to say things like (NOTE: I am making up these examples!) "you are a VB developer, I don’t think you need the Threads window shown by default" or "you are a C# developer, you have no use for the Object Browser" and so on. As a developer, I'd rather see everything. Moreover, most settings that are pre-chosen can be changed via the Tools->Options dialog so why try and bucket me, just try to educate me more about how to configure things. In any case, that is probably the saving grace for the feature: you can override and change most of the decisions made on your behalf. This is another reason you must navigate every option in the Tools->Options dialog, which I always advocate to new VS users. Besides creating, you can also persist your own settings via the Tools->Import and Export menu and can even create macros attached to toolbarbuttons for switching fast between them.

To reset VS completely (which includes asking again for a profile choice when you start it next time), from an elevated VS command prompt type: devenv /resetuserdata (warning: all your preference settings will be lost, so back them up). Try the various profiles (with your existing projects) to see what you may be missing…

Visual Studio 2010 floating windows can be maximized

Mon, October 5, 2009, 08:47 PM under VisualStudio
Sometimes the little features give you the most pleasure. At long last, Visual Studio 2010 floating toolwindows can be maximized via the maximize button (or double clicking on their title bar, of course). This featurette came late in the Beta1 cycle.

Below a screenshot of the maximize button (when window is floating) plus the menu options when you hit the triangle drop down indicator on the title bar. Also circled in red the maximized button appearance when the window is maximized:


When you combine the floating window maximization support with the VS2010 multi-monitor support, you get the productivity of being able to quickly drag a window to the other monitor, maximize it (and when you are done, restore it and return it).

As I keep saying about VS2010, ILTNUI (I Love The New UI).

Five VS2008 Smart Client features

Thu, March 20, 2008, 07:10 PM under dotNET | Orcas | VisualStudio
I have created a Smart Client session that I am repeating at various events and it is basically 5 demos. If you attended that session and heard me refer to my blog for more detailed videos of the 5 things, then please find the list below:

1. WPF and WinForms Interop: blog, screencast.
2. Managed AddIn Framework: blog, screencast and code.
3. Client Application Services: blog, screencast and code.
4. ADO.NET Sync Services v1.0: blog, screencast and code.
5. VSTO v3.0: blog and screencasts.

In addition to those links, when people ask me about other Visual Studio 2008 resources I always point them to the Top 10 and they are happy so hope you are too :)

Video on debugging into the .NET source code

Wed, January 16, 2008, 03:32 PM under Orcas | VisualStudio
Finally, what was promised back in October is now available to everyone with Visual Studio 2008 installed: debug into the actual .NET Framework source code!

All you need is VS2008 and 15' to watch my screencast that shows you step-by-step how to enable this feature.

While watching my video start downloading the hotfix for VS2008 which will make the whole experience a lot faster than what it is without it. Note: I recorded the video without the QFE.

For questions and/or more info, visit the blog of the man that made this feature possible.

Code snippet for property old style

Tue, December 4, 2007, 03:18 AM under Orcas | VisualStudio
When I first realised that the prop snippet now generates automatic properties in C# I thought it was cool. The more I write code in VS2008 though I find that when I need to write a property with get/setters that are explicitly implemented, it becomes tedious – I used to rely on prop in VS2005 too much I guess. This is easily rectified by adding a new code snippet of course.

Creating snippet is so easy it should be illegal :), but to save you the manual work here is the one I created for this purpose (propOld). Simply "save as" to your local drive and then from Visual Studio 2008 menu "Tools->Code Snippet Manager" click the "Import" button; then in a C# file type proOLD and hit TAB (instead of prop+TAB).

Compiler Features in C#3 and VB9

Tue, November 27, 2007, 01:51 AM under Orcas | VisualStudio
Visual Studio 2008 uses C# 3.0 and VB9. It uses the same version of the compiler regardless of which version of the framework you are targeting. I've talked about every new language feature and how they can be used cross-framework before, so I won't repeat myself – jump to item 4 of this post.

All I am going to do in this post is offer the slide we use at UK events that demonstrates pictorially the overlap of features between the two languages and where each one differs in terms of new features. This slide was started by my colleague MikeT (who has a great selection of UK VS2008 resources); I evolved the slide to look like this:

VS2008 Beta 2 to RTM menu changes and readme

Mon, November 26, 2007, 02:07 AM under Orcas | VisualStudio
I started the Beta 2 to RTM changes on this post and then posted some breaking changes about this, that and the other and also posted some minor amendments here and there. To close it all off, below are the remainder differences that I observed:

1. If you access the Samples via the Help menu, you'll notice there is now a Readme displayed (apparently some people fell over at the first hurdle that the readme addresses).
2. Previously in web projects, you would access the "Manage Styles" and "Apply Styles" windows from the Format menu. Now the two menu items have moved to the View menu under their brother who was always there: "CSS Properties".
3. The Database Publishing Wizard is now built in to Visual Studio, no need for separate download:


For more, please do read the Visual Studio 2008 readme which includes the steps required to go from Beta 2 to RTM.

Go To Type Definition in VS 2008

Sat, November 24, 2007, 11:21 AM under Orcas | VisualStudio
I was reading this post on the VB blog about hidden gems in VB with the VS2008 release. I knew all of them until I came to item 8: the "Go To Type Definition" menu (I am not sure if this was functional in Beta 2...). This is available only on the variable declaration and it takes you to the definition of the type of the variable.

But hang on! Couldn't we always do that? Yes, we could: The existing "Go To Definition" menu does that if you execute it by right clicking on the type rather than the variable. So, the only benefit of the new "Go To Type Definition" menu is for scenarios where you are using local variable type inference and hence don't have the type explicitly appear in your code (in order to use the existing "Go To Definition" menu).

I thought that was cute, but something was bugging me about introducing a whole new menu item for this purpose. Couldn't the VB team simply go to the type definition if I selected "Go To Definition" on the Dim keyword? I checked with some C# code that uses local variable type inference, and indeed that is what it does when you select "Go To Definition" on a var. As it happens, I prefer C#'s approach on this one.

Regardless of what I prefer, I would have like some consistency here between the two language approaches but I am sure this is where the product teams tell me that they are catering for two different audiences and I don't want to open that can of worms again.

I'll finish off by saying that I prefer what VB means by go to definition for a type, as opposed to how C# does it. In VB, going to a type definition that is not in your code, is interpreted as going to the Object Browser. In C# (since VS2005), it disassembles the signatures of the type from the external binary and presents it in C# code in a separate file – yuck! Why can't C# just take me to the OB where I can see in a more concise format all signatures and documentation? There should be a separate command for disassembling the type in header style just in case I need to copy/paste something... Anyway... mini-rant over.

VS2008 works with SourceSafe 2005

Fri, November 23, 2007, 03:28 AM under Orcas | VisualStudio
...but you need an update. Please read this post for context and where to get the update.

Thanks to one of my readers (Martin Normak) for pointing this out to me.

VB WPF project with option Strict On in VS 2008 RTM

Thu, November 22, 2007, 02:56 AM under Orcas | VisualStudio
In my global Visual Studio project settings for VB projects I always have Option Strict set to On, so any new VB project I create has this setting without me having to do it manually every time.

If you do the same as me above, then when you create a Visual Basic WPF project in Visual Studio 2008 RTM, you may get a compilation error before you have a chance to write any code:

Option Strict On disallows implicit conversions from 'System.Windows.Application' to 'WpfApplication1.Application'.

Double click on the compilation error in your Error List window and it will open the offending file: MyWpfExtension.vb and specifically the ReadOnly Application property that returns an object of type Application. The problem is that the single return statement does not perform a cast:
Return Global.System.Windows.Application.Current
So you have to change it (or in fact choose the cool auto correction option to change it for you) to:
Return CType(Global.System.Windows.Application.Current, Application)

WARNING: The following step has the potential to irrevocably cripple your machine so take backups if you decide to proceed!

If you want to change this globally on your machine and are willing to take your life into your own hands and venture into unsupported territory then you can edit the following two files (you’ll need to unzip, edit the file, and re-zip):

%programfiles%\Microsoft Visual Studio 9.0\Common7\IDE\ProjectTemplatesCache\VisualBasic\Windows\1033\WPFApplication.zip\MyWpfExtension.vb

%programfiles%\Microsoft Visual Studio 9.0\Common7\IDE\ProjectTemplates\VisualBasic\Windows\1033\WPFApplication.zip

Did I mention that the former action is not a supported scenario by Microsoft or endorsed by the product teams? Yes, good.

NewProject and AddNewItem dialogs in VS 2008 RTM

Wed, November 21, 2007, 04:54 AM under Orcas | VisualStudio
If you were running Visual Studio 2008 Beta 2 and have just moved to RTM, you'll find these minor changes in the New Project dialog:

1. When clicking on the top level Office node it shows you all the Office templates (2003 and 2007) as per the screenshot; before it would not show you anything.
2. There is a new Reporting node that has the "Reports Application" template that previously was under Windows.
3. The SharePoint Worklfow project templates now also appear under the Workflow node (in addition to appearing under the Office->2007 node).

You'll also find some minor changes in the Add New Item dialog:

4. All the WPF item template icons have had a face lift (as per screenshot above).
5. In client projects there is a new Reporting node (equivalent to item 2 above) that contains two templates: "Report" and "Report Wizard".
6. In a web project there is a new item template for Nested Master Page.

HTML, CSS, Script errors as warnings in VS2008 RTM

Tue, November 20, 2007, 05:03 PM under Orcas | VisualStudio
Comparing VS RTM to Beta 2, here is a good one:
Tools -> Options -> Text Editor -> HTML -> Validation

...enjoy the two new checkbox Options to treat errors as warnings :-)

An item placeholder must be specified on VS 2008 RTM

Tue, November 20, 2007, 07:45 AM under Orcas | VisualStudio
If you open your existing Beta 2 web projects with VS 2008 RTM, and you were using the new ListView (one of the 3 new web controls), you may face the following error:

System.InvalidOperationException: An item placeholder must be specified on ListView 'ListView1'. Specify an item placeholder by setting a control's ID property to "itemPlaceholder". The item placeholder control must also specify runat="server".

There are two changes to be aware of:
1. Instead of itemContainer (which is probably what you are using from Beta 2), you must now change the id to be equal to itemPlaceholder. Make this change and your project will compile.
2. The control that has the id="itemPlaceholder" does not get rendered at runtime anymore (it gets removed and replaced with multiple instances of the ItemTemplate). So if you were using for example a ul and had some CSS on it for the li, this styling is now lost. The solution, of course, is to place the outer element (e.g. ul) on its own and within it place a asp:Placeholder whose ID you set to "itemPlaceholder".

An example of both of the above:
<LayoutTemplate>
<ul class="myCSSrule">
<asp:PlaceHolder ID="itemPlaceholder" runat="server" />
</ul>
</LayoutTemplate>
Easy once you know how ;-)

Could not load file or assembly in VS2008 RTM

Tue, November 20, 2007, 02:34 AM under Orcas | VisualStudio
If you open your existing Beta 2 web projects with VS2008 RTM you may face the following error:

Could not load file or assembly 'System.Data.DataSetExtensions, Version=2.0.0.0, Culture=neutral, PublicKeyToken=b77a5c561934e089' or one of its dependencies. The system cannot find the file specified.

The reason for this is that many of the pre-release Fx 3.5 assemblies did not have their version set to 3.5 yet (I covered that in this post), but now they do. So if you change the version from "2.0" to "3.5" in the web.config file your project will build fine again.

At the bottom of that same post I also mentioned the weirdness of System.DirectoryServices.AccountManagement and you'll be pleased to hear that it is now placed in the correct folder and does appear in the references dialog as well.

VS2008 RTM for non-MSDN subscribers

Mon, November 19, 2007, 11:01 AM under Orcas | VisualStudio
Judging by the amount of emails I received, not everyone is an MSDN subscriber and my smiley face didn't put you off from telling me that! So, for the non-MSDN subscribers, if you cannot wait for the general availability date early next year, download a trial now and upgrade later.

Visual Studio 2008 build version 9.0.21022.08

Mon, November 19, 2007, 03:11 AM under Orcas | VisualStudio
All MSDN subscribers can now down load the final RTM version of Visual Studio 2008. If you are not an MSDN subscriber, I guess this is a great incentive to join right now :-p

If you are looking for what is great in VS2008 compared to VS2005 go read my Top 10 hyperlinked list.

If you have been driving VS 2008 Beta 2 for a while and are wondering what is new in RTM then the answer is primarily bug fixes and performance boosts. Two (out of many) quick examples: I noticed many bug fixes for WPF projects and performance improvements not just in the WPF designer but also in script intellisense. There are also some minor enhancements and some aesthetic and usability improvements for example some windows render better on low resolutions such as the Client Application Services dialog. Another is that the UAC Settings option which was previously erroneously available for Office projects (instead of just executables) is now correctly disabled. Finally, we now get an Upgrade button on the About dialog:


I'll cover more of these Beta2->RTM changes over the next 2 days, so check back.

Top 10 things to know about Visual Studio 2008 and .NET Framework 3.5

Fri, November 2, 2007, 04:54 AM under dotNET | Orcas | VisualStudio
The list below is not in order of importance, instead it is in the order I suggest you explore this new release.

1. VS2008 and Fx 3.5 will officially launch together in February but will be available to developers by the end of November 2007. The same type of Visual Studio SKUs/Editions available with VS2005 will also be available with VS2008 including a brand new one: VS2008 Shell. VS 2008 is a great Vista client, has better aesthetics and a bunch of new usability features including enhancements for multithreaded debugging.

2. Fx 3.5 continues with the additive approach that we introduced with Fx 3.0 while still not introducing a new CLR. As a reminder, Fx 3.0 simply added to Fx 2.0 without changing or removing anything in the existing assemblies (it added WPF, WCF, WF and CardSpace). So, Fx 3.5 simply adds some assemblies to the existing set of DLLs that Fx 2.0/3.0 comprises of. This means that simply installing the framework should not affect your existing solutions. Note however that Fx 3.5 depends on Fx 2.0 SP1 and Fx 3.0 SP1, which will ship at the same time.

3. VS2008 has a new simple yet powerful feature: multitargeting. The ability to create projects targeting different .NET Framework versions (2.0, 3.0 and 3.5). This means that even though VS2008 can be installed side by side with VS2005, you do not need VS2005 any longer since VS2008 offers a superset of the functionality.

4. There are many new C# 3.0 and VB9 language features (inc. automatic properties, relaxed delegates, object initialisers, type inference, anonymous types, extension methods, lambdas and partial methods). The compilers emit backward compatible IL, which is to be expected since there is no new version of the CLR. In plain terms this means that all the new language features can be used with existing v2.0 projects (due to the multitargeting feature mentioned above)! VB developers also get enhanced intellisense amongst other IDE features.

5. The headline feature of this release is LINQ (Language Integrated Query). LINQ depends largely on the language features that were introduced and also on bits of the Fx 3.5 (4 assemblies to be precise). LINQ is a new declarative paradigm for querying data sources in a consistent manner, regardless of what the data source is: in memory objects, XML, SQL, DataSet or anything else (because LINQ has been architected to be fully extensible). The future looks even brighter with efforts such as PLINQ.

6. For the web developer, ASP.NET AJAX ships out of the box with improvements and ASP.NET 3.5 includes 3 new controls. There are also enhancements in the IDE that can be used in ASP.NET 2.0 projects too, such as support for JavaScript intellisense and debugging, a new CSS engine and an HTML designer that supports Nested Master Pages.

7. For the client developer, new features include WPF project templates out of the box, a new WPF designer with integrated support for interop between WinForms and WPF. FireFox support for ClickOnce and XBAP deployments. Now, you can take advantage of ASP.NET provider services and also embed UAC manifests for application running on Windows Vista.

8. For the office developer, there is full support for 2007 Office customisations as well as Office 2003 templates. Support include outlook form regions, ribbon customisation, custom task panes, actions pane, Word content control databinding and interop with VBA.

9. For the server developer, WCF and WF templates now ship out of the box and play better together. WCF now supports a SOAP-less HTTP programming model as well as syndication and JSON serialization. There is a good collection of links for these here.

10. For the mobile developer, there are tons of new features including support for Compact LINQ and Compact WCF and many other NETCF features. At the IDE level we get Unit Testing for devices amongst other goodies from the VSD team.

11. Bonus item: It is only via VS2008 that you will be able to debug your code down into the .NET Framework methods.

XML Schemas dialog in Visual Studio 2008

Tue, October 30, 2007, 03:47 PM under Orcas | VisualStudio
A neat feature of Visual Studio has always been that you can associate a schema with an XML file and then you get intellisense in the XML for elements and attributes. In fact, if you annotate your XSD file, you can even get comments in the intellisense. Read more about the XML editor on MSDN and if you are sticking with VS2005, check out a much older blog post by Aaron.

Well, the Visual Studio 2005 dialog for picking schemas has had a facelift in Visual Studio 2008. I am talking about the dialog that appears when you have an XML document open and then from the Properties window click on the Schemas property. In VS2005 it looks like this:


On the original dialog above, note how the information presented is in a TreeView: Location of the xsd file (tree nodes with folder icon) and File Name (on the tree node with xsd icon) and the Target Namespace (in brackets on the same node). You can also select the xsd file via the tree node checkbox (i.e. a binary decision: Use or Don't Use). The final thing to note is the (mis)title: XSD Schemas ;-)

In VS2008 you can also bring it up from the XML menu:

...its title bar now has more accurate text:

The body of the dialog does not use a TreeView; instead it is a grid with an XSD file per row and 4 columns (from right to left): Location, File Name, Target Namespace and Use (all of them sortable). Take a glimpse at a full screenshot here and notice how you can easily Remove XSDs as well.

Other than a GUI re-layout (which is an interesting study in its own right if you are into that kind of thing), there is additional functionality. The Use column is not a binary decision like before, but rather a combobox with 3 options as the following screenshot shows:

At this point, I'll hand it over to the new MSDN documentation that describes the 3 options. Essentially, now you can remove the automatic binding to a schema based on a namespace, without having to remove the namespace from the XML file itself.

VS2008 for web developers

Mon, October 29, 2007, 02:52 AM under Orcas | VisualStudio
The top 3 Visual Studio 2008 IDE features for web developers, in my opinion, are:
1. New split view designer with new CSS support.
2. JavaScript intellisense and debugging enhancements.
3. Nested Master Page support.

Note that due to the multitargeting feature, the tool/IDE enhancements are also applicable to developers targeting ASP.NET 2.0 ;)

If you are looking at what is new from a platform perspective, then the top 3 IMO are:
A. ASP.NET AJAX support out of the box - 'nough said.
B. Three new ASP.NET 3.5 controls.
C. ASP.NET MVC Framework. Technically not part of ASP.NET 3.5, but it will be released later as an addition and it is too cool not to mention ;-)

BTW, back in March I listed some other blogs that you should be following for web-specific Visual Studio resources.

Support for Nested Master Pages in VS2008

Fri, October 26, 2007, 08:34 AM under Orcas | VisualStudio
As cool as master pages were when introduced with VS2005/ ASP.NET 2.0, the designer was not capable of rendering nested master pages and I imagine that for some that hindered their ability to make the most of this cool feature. In VS2008, the new HTML designer that is shared with Expression Web supports nested master pages. Read all about this on ScottGu's blog post.

The key is that when you bring up the Add a New Item dialog and select a master page template, it will allow you to check the box that offers the option to base it on an existing master page. See this screenshot.

With earlier drops of Visual Studio, the above only applies when you create a new Web Site. It doesn't apply when you create a new ASP.NET Web Application project, i.e. there is no check box there. See this screenshot.

I strongly suspect that when VS2008 is released, we will have also added a new item template for the latter case... maybe something called Nested Master Page ;-)

Five VSTO v3.0 (in VS2008) videos

Sun, October 21, 2007, 05:30 PM under Orcas | VisualStudio
Having looked at the Office extensibility stuff in Visual Studio 2008 I can honestly say: if you are a windows forms developer and you choose NOT to explore the Office customisation story, then you are genuinely doing yourself a disservice and seriously missing out. I first showed some enthusiasm on this topic through my post: Office development through pictures.

To help you go further, I have recorded 5 short screencasts:
1. Ribbon customisation.
2. Custom Task Panes and Actions Pane.
3. Outlook Form Regions.
4. Word Content Controls.
5. VBA interop with VSTO.

In addition to these videos, there are many online resources to read. There are 6 great dedicated blogs (see links from the bottom of this post) and then there is the online documentation and the Office dev centre. If you have specific questions, please visit the very active free online VSTO Forums.

WPF from WinForms in VS2008

Fri, October 19, 2007, 08:49 AM under Orcas | VisualStudio
Following on from my post about interop between WPF and WinForms, I produced a screencast demonstrating the mechanics. In the process you also get to see the WPF designer in VS2008 if you haven't seen it already. Check out the 17' video here.

WPF and Windows Forms integration

Wed, October 10, 2007, 02:23 PM under Orcas | VisualStudio
Background
Any client developer that has seen a good Windows Presentation Foundation demo/presentation will probably be salivating at the prospect of playing with this cool technology and potentially planning in their heads how they can move their applications from Windows Forms to WPF. The fact is that you don't have to and in fact shouldn't just do that yet, despite what you may have heard from overzealous presenters. Today, WPF is a great choice for consumer applications, ideal for applications where having a WOW factor is part of the requirements and definitely the only choice for software houses that have both designers and developers working on the same projects. For the rest of us building LOB apps, Windows Forms still work great and, even better, can interop with WPF if required for specific use cases. There are many resources for bidirectional interop between WPF and WinForms as well as between WPF and Win32.

The Links
In Visual Studio 2008 we get designer support for these scenarios. If you are in a WPF project simply drag the WindowsFormHost control from the toolbox and point it to a WinForms UserControl. I am more interested in the reverse scenario, so in a Windows Forms project drag the ElementHost and point it to a WPF UserControl and then you can use that WPF control (set properties/call methods, handle events etc) from your winforms. Both of the host classes are implemented in the same namespace, in the WindowsFormsIntegration.dll assembly (part of WPF).

As you can see, other than the two aforementioned classes, there is a PropertyMap class that translates properties from winforms control to WPF elements (with help from the PropertyTranslator delegate) and you can read more about it on MSDN's aptly named Property Mapping page. In the same namespace you can also see 4 subclasses of EventArgs (ChildChanged, IntegrationException, LayoutException and PropertyMappingException) used by events.

"Hello World"
1. In VS2008, create a new WPF User Control Library project.
2. Using the designer for UserControl1.xaml create some UI or paste in the XAML section a UIElement if you already have one.
3. In the same solution, add a new Windows Forms project (in VS2008 target v3.0 or v3.5).
4. From this winforms project add a reference to the WPF User Control project
5. Rebuild all.
6. With the Form1 designer open, open the toolbox and find the UserControl1 that you created (in WPF).
7. Drag it onto the Form1, resize to your liking (it doesn't have to be docked and can coexist with WinForm controls on the form).
Notice how what it effectively did is create an ElementHost for you and set its Child property to the UserControl1? When it adds the ElementHost, it also adds references to the WindowsFormsIntegration, PresentationCore, PresentationFramework, WindowsBase and UIAutomationProvider assemblies. You can repeat the exercise by replacing step 7 with manually dragging an ElementHost onto the form and then using the ElementHost Tasks popup to select the hosted content:

8. Ctrl+F5
9. Exercise for you dear reader: Follow the links above and see what cool sample you can come up with ;-)

FxCop rule for red bits

Wed, October 3, 2007, 04:43 AM under Orcas | VisualStudio
In my sessions I always explain the red and green bits story and then focus on describing the enhancements in the green bits – after all that is what people want to hear when attending a session on .NET Framework v3.5. I also make it clear that if you upgrade your projects to VS2008, you can leverage multitargeting to continue to target Fx v2.0.

Take those statements and combine them with my blog posts on the red bits (e.g. start here with this one). It should quickly become obvious that there are few little obscure additions at the public API surface level of v2.0 that, if you do take advantage when targeting v2.0 from VS2008, will result in your code crashing when deployed to a machine that only has v2.0 without the updates. That was a long sentence so feel free to re-read it ;).

The way Krzysztof describes it:
"But now I have to confess, there are some limitations in this design that we accepted when we made the original simplifying assumption. There is a very limited number of APIs being added to the Red assemblies and the multi-targeting system is currently not able to detect these."
To download his FxCop rule that addresses the deficiency in the VS 2008 multitargeting system for this niche scenario, visit his blog post. Note that even if you do not have VS2008, you can still download his Test.csproj and try to build to see the compiler errors in VS2005 on types/methods that do not exist. Go.

By the way, on a not so unrelated note, I found an interesting post which explains why previous versions of Visual Studio only targeted one framework version. Thought I'd share.

Video on Partial Methods in C# and Visual Basic

Fri, September 28, 2007, 01:30 AM under Orcas | VisualStudio
Recently I published a 15' video on a new VB9 and C# 3.0 language feature that is of course usable by projects targeting Fx v2.0 as well. The feature is called Partial Methods (not to be confused with extension methods).

Watch the screencast here.

Multithreaded Debugging Enhancements in Visual Studio 2008

Tue, September 25, 2007, 05:51 AM under ParallelComputing | Orcas | VisualStudio
Rather than writing or screenshoting the new multithreaded debugging enhancements in Visual Studio 2008, I thought I'd create a 15' video to demonstrate them. See if you can spot what the bug is before I "discover" it in my demo ;-).

Video: Build UAC aware apps with VS2008

Thu, August 23, 2007, 04:22 PM under Orcas | VisualStudio | UAC
One of the improvements in Visual Studio 2008 for building Windows Vista applications that work correctly with User Account Control is the ability to embed manifests in Visual Basic and C# projects. Watch my 15' video to see how.

Video: VS2008 Aesthetic and Usability enhancements

Wed, August 22, 2007, 12:54 PM under Orcas | VisualStudio
If you ignore the framework and compilers, then what is new in Visual Studio 2008 purely from an IDE perspective? Find out in my 10' video here.

VS 2008 Tools menu

Fri, August 17, 2007, 08:16 AM under Orcas | VisualStudio
I opened the Tools menu of VS2008 Beta 2 and observed three changes compared to Beta 1. Can you spot them without reading beyond the screenshot:

(Obviously the "Upgrade Visual Basic 6 Code..." is not available in C# projects but everything else is the same in C#)

That's right:
1. The "Device Emulator Manager" moved up next to the other Device options.
2. There is a new menu item "Partner Product Catalog" which seems to open a web page with VSIP members.
3. The "WCF SvcConfigEditor" is back. For more on this configuration editor tool visit the relevant msdn page.

Watch my video on VS2008 multitargeting

Thu, August 16, 2007, 02:35 AM under Orcas | VisualStudio
Soma writes about one of my favourite features of Visual Studio 2008 (that is actually an msbuild feature). If you want to see it in action, watch the 15' video I recorded last week on channel9.

Visual Basic video

Tue, August 14, 2007, 05:49 PM under Orcas | VisualStudio
I recorded a 13' video on the improvements in VB intellisense (codenamed "intellisense everywhere") with VS2008. For more context and to watch it go here.

VS2008 supports Restart Manager

Tue, August 14, 2007, 03:15 AM under Windows | Vista | Orcas | VisualStudio
Two of my favourite new APIs of Windows Vista are: restart/recovery and Restart Manager.

I mentioned in passing that Orcas March CTP supported the restart API. I haven't had a chance to test if that area has been improved because I can't get Visual Studio 2008 Beta 2 to crash! If you have a repro case that crashes Beta 2, please let me know how.

How about Restart Manager support by Visual Studio 2008? I had tested this with Beta 1 and the answer was "no". Tested it with VS2008 Beta 2 and the answer is a resounding "yes". Not only it supports RM for being gently shutdown, but it actually does the right thing when it is restarted which is to auto open the solution you had open even down to the file you were viewing! If you had a file unsaved, it will prompt you on restart if you'd like to recover:


To see the RM functionality with VS2008 in action on your Vista machine running Beta 2, one easy way is to download my Vista demos, locate the project in the folder "RestartManagerSimulator", build it and then execute from the Debug folder the executable: RestartmanagerSimulator.exe. You should see an app that looks like this. In the textbox enter "devenv" (without the quotes) and hit the buttons in order: "Supports Restart?", "Register" and "Shutdown". Wait while that operation completes and Visual Studio exits. Then click on "Restart" and watch the magic happen ;-)

SortOrder in item VS2008 templates dialog

Mon, August 13, 2007, 07:37 AM under Orcas | VisualStudio
One of the annoying things of Visual Studio 2005 is that when you try and add a new item to a project the templates are listed in non-alphabetical order and there is no way to change that from the GUI. There are a couple of workarounds for VS2005 (e.g. see links from here), but they involve more work than to my liking.

Visual Studio 2008 improves the story by (almost always in Beta 2) sorting alphabetically :-)

Nice! The same is partially true for the New Project dialog. Also, as an added bonus, both of these dialogs are now resizable as the screenshots prove ;-)

Relaxed Delegates

Sun, August 12, 2007, 10:53 AM under Orcas | VisualStudio
I knew about covariance and contravariance that we got in the .NET 2.0 timeframe and I also knew that VB 9.0 (shipping with Visual Studio 2008) would fully support the feature and even enhance it. I hadn't appreciated how much it would be enhanced until I accidentally run into it yesterday (while recording a video on VB intellisense improvements).

I created a thread and had the delegate point to a method that I had already written. So I went to change my method to accept the Object as an argument and before having a chance I noticed that VB's background compiler hadn't complained about it!? In case you haven't guessed it by now, in VB9 you can omit the parameter list of a method pointed by a delegate, if you wish ;-)

Example:
' No need to type (s As Object, e As EventArgs)
Sub Button1_Click() Handles Button1.Click
Dim t = New Thread(AddressOf MyWorkerMethod)
t.Start()
End Sub

Sub MyWorkerMethod() 'No need to type (o As Object)
'Do sth on worker thread
End Sub

Read more about relaxed delegates on msdn (bottom of the article). Like with all other language features, you can use this one in your .NET 2.0 projects in VS 2008.

prop snippet

Sat, August 11, 2007, 02:24 PM under Orcas | VisualStudio
Hot on the trails of the improvement in the foreach code snippet in VS2008, I found that the prop snippet also changed:

Yup, automatic properties by default ;)

VS 2008 SKUs

Fri, August 10, 2007, 04:06 AM under Orcas | VisualStudio
With Visual Studio 2008, like with VS2005, we have the 4 Express Editions (C#, VB, C++, Web) and we also have the Standard and Professional Editions as well. PRO is what I typically use and, with VS2008, PRO now includes support for Unit Testing.

We also have the Team System Editions (Architect, Developer, Test, Database) inc. TFS and Test Load Agent, of course. With VS2008 the names for these have been rationalised and simplified. I may do a post in the future summarising the new stuff in VSTS 2008 (for now, you can view the complete feature list for TFS 2008).

There is also a new kid on the block. I am personally very excited about this and have added to my TODO tome to put aside some time to play with it: Visual Studio 2008 Shell (and its free!).

foreach uses var

Mon, August 6, 2007, 04:32 AM under Orcas | VisualStudio
Whenever I want to loop through a collection of some sort, in C# I type foreach and hit the TAB key twice (to invoke the code snippet). This gives me the following code template:
    foreach (object var in collection_to_loop)
{

}
...where object is highlighted so you can change it to the real type of your collection, var is highlighted so you can change it if you wish to have your own variable name and collection_to_loop is highlighted so you can change it to your actual collection variable name.

This always looked awkward to me when playing with LINQ since I typically use the keyword var to replace the object and then immediately I am confronted with var as the variable name that I change only so the awkwardness can go away.

In Visual Studio 2008 Beta 2 you get the following with the foreach code snippet:

No awkwardness, automatic use of local variable inference and, generally speaking, only one item to replace: collection.

Are you revisiting your own code snippets making them more user friendly?

Extension Members in Object Browser

Sat, August 4, 2007, 05:08 PM under Orcas | VisualStudio
Recall the new C#3 and VB9 language feature extension methods? Well, if you go into the object browser in Visual Studio 2008, there is an option to display extension methods for the chosen class. The following screenshot depicts that for the XElement (from XLinq):

Nice! The 3 extension methods (Validate and GetSchemaInfo) are actually defined in the static System.Xml.Schema.Extensions class, but still show up where we'd expect them to.

The above screenshot is in a VB project and I cannot get this feature to work reliably for me in C# projects yet. The option is there in both projects, but the result isn't. Here is how you enable the feature btw:

Go check it out...

Partial methods

Fri, August 3, 2007, 02:41 AM under Orcas | VisualStudio
With VS2008 Beta 2, we all get a chance to play with a feature that the product teams have been teasing us with by talking about it before it was available in public drops.

[Request to product teams]If your feature is not baked in public bits, please refrain from blogging about it; also please stop posting images of private bits.[end request]

The feature in question is Partial Methods. Wes has an excellent write up here from a C# perspective (that he followed with this) and Scott here from a VB perspective. I suggest you read both since at the conceptual level they are the same. Essentially it is an aid to code generation scenarios in the same way that partial classes are. Think of it as a combination of a more efficient version of private event handlers and the Conditional attribute. Read the previous links for the full story.

My take? I simply thought I'd see the feature in action so without referring to the posts or documentation I fired up Visual Studio to try it out from memory. How mistaken I was. Every time I tried something I was greeted with a compiler error pointing out my ignorance. I was going to post here the series of compiler errors I dealt with one by one until I managed to get the thing to compile, but instead I've tried to summarise a few of them with one line of code:

public partial bool GoGoGo(out int i); //produces the following Error List


What better way to learn than by the compiler teaching you... a bit like how kids learn that fire is hot... by touching it (well, that's the way I learnt anyway). If however you prefer reading a very long thorough post covering a feature (in addition to the 3 posts above by the product teams) and also prefer looking at things through ildasm, then head over to Bart's blog post on the topic.

More VS2008 UAC integration

Thu, August 2, 2007, 04:12 PM under Orcas | VisualStudio | UAC
I've shown before one example of VS2008 integrating nicely with UAC, but today I found another one:

The above dialog appeared after I tried creating a new SharePoint Workflow project. After selecting the "Restart" option, Visual Studio closed, I confirmed the UAC Consent dialog and VS then reopened elevated (with the title bar showing its mode) in the same state it was before.

If you find any other examples of actions that result in an elevation prompt in Visual Studio 2008, please drop me a line (other people collect stamps, I collect UAC screenshots).

UAC Settings in VB

Thu, August 2, 2007, 02:32 AM under Orcas | VisualStudio | UAC
Regular readers of my blog will know that a requirement (and more importantly good common sense) for your applications that will run on Vista is that they have an embedded manifest declaring their requested privilege for working better with UAC. With Beta 1 of VS2008 I showed how this has become a doddle for C# projects. At the time, there was no such easy option for VB projects.

With Beta 2, VB also gets an easy way to do this. If you find the GUI of the C# approach confusing, then you'll be pleased to find that the VB approach is a single button named View UAC Settings, as per the following screenshot:

Clicking on it adds a pre-populated manifest file to your project which you can optionally further tweak to your liking, of course.

Note that in C#, you can manually add Application Manifest Files yourself:

...and switch between them from the IDE. This does not seem possible from the GUI provided by the VB team.

Further note that this feature is obviously applicable for v2.0, v3.0 and v3.5 client project templates in both languages. My advice to you is to open all your client projects in VS2008 and embed the default manifest now with no further thought. Later you can determine if you need to tweak things...

Tool to collect VS2008 and Fx 3.5 setup logs

Wed, August 1, 2007, 10:23 AM under Orcas | VisualStudio
My Beta 2 installation experience was fine and dandy, but yours may not be. If you do face any issues, Aaron shows you how to collect the setup log files for diagnosing.

Unrecognized tag prefix or device filter 'asp'

Wed, August 1, 2007, 03:25 AM under Orcas | VisualStudio
If you are facing the error above with Beta 2, it is due to the changes I blogged about. Doug has a nice step-by-step investigation and the solution.

VSTO for VBA developers

Wed, August 1, 2007, 01:23 AM under Orcas | VisualStudio
A few months ago I posted about Office as a development platform with VS2008. While most of the features are easy for you to explore given the screenshots I posted, on my point 6 I only mentioned VBA<->VSTO interop with no further info. If that feature floats your boat (and it certainly will if you have existing VBA investments and would like to extend them with managed code), then go watch this 8' screencast on channel9 (or this soapbox video here).

There is also a great MSDN mag article on VSTO: Extend Your VBA Code With VSTO. It talks about VSTO and VBA interop in this section, and it also touches on ClickOnce deployment in this section.

Finally, relevant to the above, I thought I'd share a new (to me) acronym that I picked up this month: OBA (Office Business Applications).

LINQ's relationship to the new language features

Tue, July 31, 2007, 03:43 AM under Orcas | VisualStudio | LINQ
If you are interested in understanding the relationship of the new C#3 and VB9 features to LINQ, then watch my 20' screencast and let me know there if you have any questions (unlike other videos, I advise you not to speed it up, because I speak very fast as it is ;)).

Version and location changes in Beta 2

Mon, July 30, 2007, 02:10 AM under Orcas | VisualStudio
With Visual Studio 2008 Beta 2 some (good) changes were made to the location and versions of the .NET 3.5 assemblies, which previously were quite inconsistent (two additions were also made and I updated the previous post with those).

The .NET folder under Windows (C:\Windows\Microsoft.NET\Framework\) does not include a build number in its name now, it is just "v3.5" (with Beta 1 it was "v3.5.20404"). If you had explicit references to that location (e.g. in code, config files etc) you will have to change them.

The file versions of the v3.5 assemblies is now 3.5 (that was not the case previously for all of them). They still differ slightly between them on the build number but at least most[1] of them are now in the same place and you can see that in the following partial screenshot of "c:\Program Files\Reference Assemblies\Microsoft\Framework\v3.5\"


Now with Beta 2, the assembly version numbers are more consistent with each other (and different to the file versions of course). You can see those using your favourite disassembler, or simply via the VS references dialog:


As a reminder, to understand what each one of these assemblies offers, see my blog entry on the green bits.

[1] In the 3rd paragraph above I wrote "mostly" because there is one assembly that is not in that same place: System.DirectoryServices.AccountManagement.dll is one level up in the folder hierarchy (!). So to reference this one you have to browse explicitly to that path from the VS references dialog. Its file version number is consistent with the rest (3.5.20706.1) and its assembly version is 3.5.0.0

Organize Usings in VS2008

Sun, July 29, 2007, 12:06 PM under Orcas | VisualStudio
In my demos you will never find superfluous using statements at the top of code files. When I am trying to explain some new API, I want it to be very clear what namespaces are being used. I have seen many other presenters that leave in there every namespace under the sun and it always annoys me. The other thing I try and do is remove references to assemblies that I am not using (for the same reasons). In fact, I used to do both of these even in real projects; even though there are zero performance implications for either, it just felt cleaner to me.

Now with VS2008 the manual process of removing namespaces is taken care for you. Simply right click in a code file and you see a new option as shown here:


Great! I am not so sure about sorting though. It sorts alphabetically and perhaps that is a good idea now that I think of it, but I am used to sorting my namespaces by length from shortest to longest so a nice triangle is visually formed (yes, I am weird, I know). More seriously, I usually just leave the last namespace I imported appear at the bottom of the list...

The sad thing is that this feature only takes care of using statements and NOT of assembly references as hinted in my opening paragraph. The ironic thing is that while this is a new C#-only feature, in VB (even with VS2005) you can indeed remove unused assembly references from the project properties. If only the two teams talked to each other and both decided to implement the other's complementary feature...

Open Beta 1 solutions with Beta 2

Sun, July 29, 2007, 10:11 AM under Orcas | VisualStudio
One of the annoying things on my machine after installing Beta 2 was that my existing Beta 1 solutions would not open by double clicking on them. I could open them from within Visual Studio and I could open project files by double clicking on them, but not sln files created with Beta 1.

If anybody else is facing this, my solution (pun not intended) was to open the solution file in Notepad and change the second line from:
# Visual Studio Codename Orcas
to
# Visual Studio 2008

If only everything was this simple...

VS2008 Installation experience

Fri, July 27, 2007, 03:49 AM under Orcas | VisualStudio
Before installing anything these days, I always explicitly run Windows Update. The last thing I want is for an update to kick off in the middle of an install. I encourage you to do the same!

My first attempt to install Beta 2 Professional edition was to be optimistic and install it over Beta 1 on my Vista machine. This dream ended as soon as I run the setup:

So I went to the "Programs and Features" page in control panel and removed "Visual Studio Codename Orcas", which removed a whole bunch of other related things. I then run the setup again and life was good:


After clicking "Install" on the dialog above, the first item that the setup tries to install is .NET Framework 3.5. This took absolute ages on my machine (over 10 minutes). Midway through it was obvious that it had invoked Windows Update because Windows Update gave me the message that it wanted to restart my machine. I thought I'd play it safe (and advise you to do the same) so I selected "Postpone for 4 hours" on that dialog. I then waited and eventually the VS2008 setup informed me that a reboot was required. Of course, I accepted that one. After Vista rebooted the setup continued automatically with no intervention on my part. Apparently, some people (without admin accounts) have to start it manually again so your mileage may vary.

So what was the Windows Update thing that was invoked by the setup, especially since I had manually run windows update before? That is the Service Pack 1 for v2.0 and v3.0 of the .NET Framework (fyi, explanation of red bits). The setup knows where to go and look for them and right now they appear as hotfixes: KB929300 and KB110806.

After that, the rest was as smooth as peanut butter (the smooth variety, not the chunky one).

VS2008 Beta 2 with go live license

Thu, July 26, 2007, 02:23 PM under Orcas | VisualStudio
The moment we've all been waiting for: Visual Studio 2008 Beta 2 hits the streets so get it now

This one has a go-live license associated with it which means that the team are confident about the quality of the product and also about the final feature set. Apparently, you will be able to go smoothly from this version to the RTM version later this year. All changes between this one and the RTM version will be documented, they say. What I can tell you from personal experience is that this build is very solid and has not malfunctioned on me once in the last X days that I've been running it.

You have no reason to wait any longer, go download it and start using it for your existing v2.0/v3.0 projects and later consider taking advantage of the new v3.5 features. Remember, VS2008 has everything in the box :-)

Class Designer for C++ in VS2008

Mon, July 23, 2007, 01:54 PM under Orcas | VisualStudio
One of my top 3 favourite features when VS2005 came out was Class Designer (blogged about it 3 years ago). With VS2008, I cannot say there are major enhancements for the Class Designer, but now it is partially supported for C++ projects as well. The team is asking for your feedback so go give it while it's hot.

VS2008 integration with UAC

Wed, June 20, 2007, 02:52 PM under Orcas | VisualStudio | UAC
You know that when you run VS2005 on Vista (even with SP1 and the SP1 update) you get advised to run elevated. You also know that VS2008 has better indication when you run it elevated.

What I haven't explicitly stated before is that VS2008 does not require you to run it elevated from the start. Instead it is a good Vista client and plays nicely with UAC by only prompting you to restart the IDE when you truly need to. For some type of projects this will equate to always run elevated of course, but it is good that it doesn't force this behaviour on all of us and that it offers to do it for you as needed.

Recently I discovered one scenario where it plays nicely. I double clicked on a solution file in explorer and because it was in a place requiring admin rights, I got the following dialog from VS2008


This is cool (even though I suspect the final text will be slightly different as there are a couple of errors there e.g. UAC = User Account Control).­­­­­­­­­­­­­

Visual Studio 2008 stack

Mon, June 4, 2007, 07:02 AM under Orcas | VisualStudio
When Visual Studio 2008 (formerly Visual Studio codename "Orcas") ships in FY08, we will also get other elements of the stack. Below is the opening slide I use at Orcas events:

The main points are that the CLR engine is the same version (so no need to retest your apps) and that the headline feature is the language enhancements (C#3 & VB9 compilers) and LINQ.

The VS2008 IDE is not as big a jump as it was when going from VS.NET2003 to VS2005 and it includes all of today's SDKs out of the box and also a simple yet sweet feature: multitargeting inc. the ability to use new language features from .NET 2.0 projects. FYI, I usually do a demo of new IDE features that lasts 15 minutes (inc. aesthetics, VB intellisense, embedding manifests and new Office templates). Given that VS2008 is a superset of VS2005, there is little point in having both of them installed on the same machine, but it is possible – we support side-by-side at the IDE level.

So that is the IDE, languages and CLR in a nutshell. How about .NET Framework v3.5? For that you'll have to see my blog post tomorrow.

Visual Studio Orcas SDK June CTP

Sat, June 2, 2007, 03:28 AM under Orcas | VisualStudio
Want to work with VS "Orcas" Beta 1 extensibility points? Get the SDK here.

Import namespace in VB9

Sun, May 20, 2007, 02:10 PM under Orcas | VisualStudio
A cute Whidbey feature in the C# 2.0 editor is that when you type in a Type that is not in scope, the IDE will let you choose to automatically either fully qualify the type or to add the appropriate using statement at the top. The editor for the VB8 experience is not that great, as shown by the following side-by-side screenshot:

BTW, for my C# readers, that is not a mistake, VB does allow partial naming of namespaces so since System is in scope, you can simply type Threading.Thread and it is acceptable. A bad habit IMO, I suggest as a guideline that you fully qualify the types starting at the root namespace.

Recently I was typing some VB9 code in "Orcas" and observed that the VB editor has caught up with the C# behaviour (plus it follows my guideline of the previous paragraph), as shown by the following screenshot:

Nice! And just like any other IDE language feature, it is not just for the latest version, but for the previous version as well (thanks to multitargeting).

Using C# 3.0 from .NET 2.0

Sun, May 13, 2007, 03:15 PM under Orcas | VisualStudio | LINQ
Please note that this and my next post are based on Beta 1 Orcas bits. Later builds might change the facts so always try it yourselves.

There still appears to be some confusion with regards to the new language features that make LINQ to objects work. In particular, there are claims that it all works with .NET 2.0 and counterclaims that it doesn't. IMO the confusion arises from people not being precise about what they are talking about. I'll try and give you here my view (which of course I think is as clear as can get :-))

To start with, everything here is in the context of Visual Studio "Orcas" – forget earlier versions. Orcas supports multitargeting so you can build projects that target .NET Framework v2.0. So the real question we are addressing here is whether you can choose to build a NetFx 2.0 project that also uses some of the new C#3 language features.

If you are not familiar with LINQ, please go read my detailed LINQ blog posts and then come back. So after reading about LINQ I hope you realise that:
LINQ =
1. local variable inference +
2. object intiliazers +
3. anonymous types +
4. lambda expressions +
5. extension methods +
6. query expressions +
7. framework support.

Let's look at some of the language features. The first 4 do work with 2.0 projects i.e. the following compiles and runs fine in a 2.0 Orcas project:
class Program
{
delegate T Func<T>(T t);
static void Main(string[] args)
{
// object init -
// makes no sense in this example but hey...
Timer t = new Timer(2000)
{
AutoReset = false,
Enabled = true
};

// local var inf, anonymous types
var i = new { Name = "Fred", Age = 6 };
Console.WriteLine(i.ToString());

// lambdas
Func<int> f = j => j + 1;
Console.WriteLine(f(5));

Console.ReadLine();
}
}
Can you spot them? Local variable type inference, object initiliazers, lambda expressions and anonymous types. This shouldn't surprise you if you read my previous blog posts since I have stated clearly many times that these language features are simply compiler tricks. The IL that gets generated is the same old IL – no dependency on the framework and no dependency on the runtime. So 2.0 projects in Orcas can use 4 of the smart compiler tricks, this is good! As an aside, other 3.0 compiler features irrelevant to LINQ such as automatic properties, also work in 2.0 projects.

On the gloomy side, it goes without saying that number 7 above, the "framework support", resides in System.Core.dll and you cannot reference that assembly from 2.0 projects, so no extension method implementations for you in 2.0 projects. If at this point we think of number 6 above, "query expressions" (i.e. from...where...select syntax), we realise that their usefulness is in friendly mapping to the extension method implementations in System.Core.dll (or System.Xml.Linq or Systam.Data.Linq or your own extension method implementations). So even though query expressions are supported when targeting v2.0 projects from VS "Orcas" (the syntax highlighting when you try it is a clue) there is no implementation to map them onto - other than your own. Well, even your "own implementation" implies that you can use Extension methods for v2.0 projects and I haven't addressed that yet (number 5 above). See my next post now.

Multitargeting

Fri, May 11, 2007, 09:30 AM under Orcas | VisualStudio
I have talked about and screenshoted multitargeting before in Orcas. When you create a new 2.0 or 3.0 project, features that are in v3.5 will not be available in your toolbox or properties or the references dialog. What I hadn't realised until today was that you can still see them even though they are not available, which I think is cool. Notice in the following screenshot how System.Core.dll is greyed out in my 2.0 project references dialog.

If you create a project and then change the framework you target to be a lower version than what it was before, you will get compiler errors for anything that isn't present, of course.

Repaving and how VS Orcas saves me time

Thu, April 26, 2007, 04:09 AM under Orcas | VisualStudio
Recently I repaved my Toshiba M5 starting from scratch (format, Vista RTM, join domain etc). The way this works for me is that I have a secondary drive in the laptop with all my data plus apps (multiple msi files, setup.exe files, iso images etc). I install the OS on the main drive and then continue to install the other applications from the 2nd drive. Looking at my instructions (I've written a simple installation todo.txt file that reminds me of what to do), I used to install the following for my mobile development needs: VS2005, SP1, SP1 Update for Vista, Latest NETCF SP, WM5 PPC SDK, WM5 SP SDK, DE v2. I am sure this isn't the story for device development only, but that every developer has their own set of things they install on top of VS e.g. WF Extensions, WPF/WCF extensions, VSTO SE, AJAX, MOSS SDK etc - overall a dozen or more separate installation packages (separate to install, separate to maintain/keep).

With the advent of Orcas Beta 1, I decided to ditch VS2005 completely and only install Orcas as my sole dev environment (btw, without multitargeting this decision would not be possible). It is only then that I truly realised that I do not need *any* of the above extras/extensions/SDKs since they *all* ship in the box as part of the single installation! :-)

The side benefit of this is that, previously if you had no interest in some technology (e.g. Office development or web development or device development) you probably wouldn't bother installing something separate, but now the story is different: it is just there so you can have a quick play with it whenever you want and ignore it thereafter if you still don't fancy it.

What will YOU install the next time you repave your machine: VS2005 side-by-side with Orcas or just Orcas?

Transparent Intellisense

Tue, April 24, 2007, 02:05 AM under Orcas | VisualStudio
While no doubt everyone will be talking about VB intellisense that I’ve mentioned before or the Javascript intelisense, I just discovered another small improvement in the Orcas IDE.

You will recall that VS2005 introduced DataTips (debugger tooltips on steroids) and when you hold down the Ctrl key they become transparent. Well, that is now true as of Beta 1 for the intellisense window too! In the screenshot below, the left side is what you would face today but with Orcas Beta 1 hold down the Ctrl key and you can see what is below the intellisense window without having to close it, as shown on the right:


I wonder how many people will discover that. It reminds me of another little known feature introduced in VS2005, which I still encounter people today not knowing about: ability to resize the intellisense window... try it if you haven't!

Orcas Office development through pictures

Sun, April 22, 2007, 12:02 PM under Orcas | VisualStudio
At this year's UK MSDN roadshow day (btw, next one is this Wednesday 25th) we have five 70' session slots. MikeT shared our reasoning for including a 10' office bit at the end of each core 60' session. Most of the people that I spoke to said that before the event they didn't care about Office development but after seeing how easy it is to do and realising the benefits, they have more of an open mind now. Given that it seems not so easy to find information on Office development, Martin did a great job pulling together starting points. Go check them out!

In "Orcas" the Office story gets even better:
0. Office 2003 and 2007 development out of the box. No need to download a separate VSTO (SE) SDK.

1. New project types. Now you can create out of the box add-ins at the document/template level, rather than just the global application level only. Feast your eyes on these project templates:

For Office 2003 project templates, see this screenshot.

2. Ribbon designer. No more manual authoring of XML, just drag and drop ribbon controls into groups on tabs, set properties and you are done (the familiar winforms paradigm).

In the image above you see properties for the button, but you can also tweak properties (and handle events) for the other ribbon elements (i.e. tab, group) including the ribbon itself such as its OnLoad event! If you right click on the ribbon in the designer you get the option to generate the XML (and cs) file - attendees of my roadshow session know XML was the only approach available with VSTO SE:


3. To customise the ribbon for any of the 2007 Office applications you have to select the appropriate item template from the Add New Item dialog:

If you created an Outlook project, as you can see the dialog above also offers the Form Region option. That's right, support for Outlook 2007 Form Regions is now available via Windows Forms controls (no more manual messing with OFS files) and the wizard even offers the option to import existing projects (this last option is not functioning yet in Beta 1):

Click for screenshots of STEP 2 and of STEP 3.

4. From the first screenshot of this blog post you saw that we can create document and template level projects for Excel and Word. Picking any of those leads you to a dialog similar to this:

After that you can add new document level Actions Pane items (don't confuse with Custom Task Pane which works at the application level and is just a UserControl):

Specifically for Word projects, in design mode in VS you can add to Word's surface (and even databind!) Content Controls:


5. Even though all of the above is Office client-side, under the Office banner we include the server-side technology SharePoint. Authoring workflows for SharePoint in VS2005 involves a 15-step configuration process (which some of you will have seen me perform for the UK developer launch of Office in January :-)). In "Orcas", you simply design the workflow and hit F5 including easy debugging. The complex stuff is taken care of by a wizard, whose first step you can see here:


6. Naturally I don't have teaser screenshots for every Orcas Office feature so I leave it to you to discover the interoperability between VSTO/VBA (i.e. call the former from the latter), support for the new Office file format and ClickOnce improvements...

In short, with VS Orcas and Office 2007, I am finally beginning to see the meat in the phrase: "Office as a development platform"...

In addition to the links at the top, you may find interesting these Office blogs here, here, here, here, here and here.

VB intellisense in Orcas

Fri, April 20, 2007, 06:49 AM under Orcas | VisualStudio
From the first time I typed Visual Basic code in Orcas I've had on my list to do a short video to show the new and improved intellisense because only video can do it justice. Since Amanda let the cat out of the bag by posting some screenshots, I am left with no choice but to share even more of the intellisense story with you :-)

Basically, it is everywhere. When you start typing "D" to declare/dimension a variable, it will pop up:

...when you then continue to declare the type of the variable, it will help you again:

...it comes into its own with the new LINQ syntax:

...and at the end of code line, when you press the spacebar, it will even prompt you for the continuation line:


You just have to go type some VB code in Orcas to truly appreciate how helpful it is. However, the killer for me is what I will refer to as "member filtering" as I have no idea what the official name is. With this feature, after hitting the dot (".") on a class variable and as you type, the intellisense window filters down to the more appropriate member. See the following 3 screen captures that I combined into one screenshot image:


In the example above, first we have the list of all members of the Process class, then after typing "p" the list gets filtered down to only members starting with p and then finally when we type "ro" the list goes down to just the two members starting with "pro". If I continued typing when I reached "n" in "ProcessN" I would have been left with just one member.

And all this great intellisense is of course also available when targeting .NET 2.0 projects (minus the LINQ stuff) due to the Orcas multi-targeting.

Aesthetic and usability in Orcas B1

Fri, April 20, 2007, 05:15 AM under Orcas | VisualStudio
After installing Beta 1 on my Vista machine, I found that the look and feel of things I previously blogged about had changed for the better.

* Ctlr+Tab got a facelift. For previous screenshot and the new one see my updated blog post: Ctrl+Tab in Orcas.

* The ability to target multiple framework versions from a single IDE is still there but now it is more obvious (they must have heard my winging :-)). Check out my updated post on Multi-targeting.

* For Smart Device Projects, I complained about the combobox not remembering the selection and now that is fixed. The VSD team also added a bonus feature in this release. Check out my updated post on the new Project Dialog.

* Like in previous builds, we have nice rounded selections in the menus...

...if you complete the action of the screenshot above, you will of course get this dialog. Notice how the treeview under Project Types displays no plus/minus for expanding/collapsing the nodes? If however you hover the mouse on the treeview then new triangle expandos appear as per the following screenshot:

For more on what is going on here read my post on TreeView Vista (basically the VS team put in the extra effort to spice this up on Vista :-)).

Get Orcas Beta 1

Thu, April 19, 2007, 01:30 PM under Orcas | VisualStudio
Visual Studio codename "Orcas" (and NetFx 3.5, C# 3, VB9) has reached Beta 1.

The huge VSTS VPC image is available right now here and other SKUs will follow. You can even get the lightweight Express SKUs here and the TFS Server here. Personally, I'd wait a bit longer for the installable bits of the Pro Edition which for the first time is even supported on Vista :-)

As always the feed that tells you these things is worth subscribing to over here.

Orcas for Web developers

Wed, March 28, 2007, 11:25 AM under Orcas | VisualStudio
My colleague MikeO looks after the web space here in the UK and he started a list of what is new in Orcas here.

Inspired by his list I searched the blogosphere (yeah that word makes me cringe too...) and found more on the three things that caught my eye:
1. Script intellisense (here)
2. New web form designer (here)
3. Better CSS support (here)

If you are a web dev, stay tuned for more Orcas goodness by following those 4 blogs above...

Of course other generic aspects of Orcas apply equally to the web story such as multi-targetting and LINQ.

Installation of March CTP on Vista

Sat, March 10, 2007, 04:02 PM under Orcas | VisualStudio
The point of this post is: do not install the Orcas March CTP side by side with VS2005 on Windows Vista.

This CTP is not meant to be installed directly on Windows Vista. It can happily be used in a VPC on Vista and it is also meant to be installed directly on XPSP2 or WS2K3. Given that Virtual PC 2007 is now free and is supported on Vista, just install it in there or grab the VPC image already built for you. You'll love it. Obviously the final version of Orcas will be supported directly on Vista and indeed so is the plan for the next Orcas drop whenever that comes. Furthermore, the final version of Orcas will side-by-side with VS2005 and while this March CTP does side-by-side, it does have some issues so, again, I would not recommend the side by side thing yet.

Now, given what I just said, you won't be wrong to call me a "fool" for actually installing Orcas on my Vista machine to side by side with my VS2005 installation. This has caused me at least 3 issues:
1. Getting NETCF installed needed some manual help from me, my device forms do not render in the designer and I also had some WM5 SDK conflict issues. If you are not doing device development, these won't affect you of course.
2. My existing installation of Visual Studio 2005 Tools for Office Second Edition broke by the Orcas install e.g. my VS2005 excel add-in projects fail with weird compile errors. I fixed this by repairing the VSTO 2005 SE installation.
3. My Orcas properties grid is broken.
4. I haven't had this issue but others have: "Orcas" Web applications fail on Vista.

On the flip side, all my LINQ demos work great!

Once again, best option is to use the VPC image in our free VPC2007 software. Equally good option is that you install it yourself on a non-Vista machine without VS2005. Remember, it *is* a Community Technology Preview!

NetFx support in VS Orcas

Tue, March 6, 2007, 04:55 AM under Orcas | VisualStudio
UPDATE: After Beta 1 I updated the screenshot below (you can still view the old one here).

As you know, Orcas is the codename for both the next version of Visual Studio and the next version of the .net framework (v3.5). The great news is, that VS "Orcas" not only lets you create projects that target v3.5 but it can also target v3.0 and v2.0 as the following screenshot shows:


If you pick the wrong template (which I am guessing many will since the version dropdown is in a non-obvious place IMO), then you can change the platform later via the project properties under the Application tab:

In VB, the option to change it later is via the Advanced Compile Options under the Compile tab.


Some will say "at last", all I can say is... "Cool!"

Embedding manifests in Orcas

Tue, March 6, 2007, 04:45 AM under Orcas | VisualStudio | UAC
The first thing you should do with your applications on Windows Vista (and indeed a logo certification requirement) is embed a manifest in your application that effectively tells Windows that your app is aware of User Account Control. I have explained how to do this with VS2005 here. Also Catherine listed a few ways here. Bottom line: create a manifest like this, and embed it in your project with a post-build command: "$(DevEnvDir)..\..\Common7\Tools\Bin\mt.exe" -manifest "$(ProjectDir)$(TargetName).exe.manifest" –outputresource:"$(TargetDir)$(TargetFileName)";#1

In VS Orcas C# projects, life becomes slightly easier. Effectively, there is a combobox under the Application tab in the project properties that allows you to point to a manifest and then it will embed it in the application. I cannot find this option in VB projects yet.

To me, there isn't much difference between pasting the command line from further above in the post build box and instead choosing a combobox item. However the latter does have the advantage of being more discoverable :-)

UPDATE: FYI, I got the below from Saurabh Jain (a dev on the team responsible) with regards to the March CTP:
"There is more support for manifests then you might see.

Firstly, the compilers have new switches for manifest, so there is no post build event.

C:\>csc.exe /? | findstr -i man
/win32manifest:<file>   Specify a Win32 manifest file (.xml)
/nowin32manifest        Do not include the default Win32 manifest
Secondly, if you have a .manifest file in your project, that file will appear in the dropdown. You can then select the file, and it will be passed to compiler. This is how one can add a custom manifest file."

Microsoft.VisualStudio.Shell.WindowPane.OnCreate

Tue, March 6, 2007, 04:21 AM under Orcas | VisualStudio
"An error occurred trying to load the page." is what I encounter in my "Orcas" installation whenever I try to open the project properties grid/designer as captured in the following image:


In case you are facing this too, it is a side by side issue with VS2005. If you've only installed Orcas on your box without VS2005 (or downloaded the VPC image) then you will not have this issue. Sorry, no workaround for now, but fixed for future builds.

This blog entry also explains why some screenshots of the property pages that I am about to post are from my VPC WS2K3 Orcas installation rather than my Vista installation like my other screenshots :)

Automatic properties in C#3

Mon, March 5, 2007, 04:36 AM under Orcas | VisualStudio
I was looking at Ander's slides from Tech Ed Europe and he had one about automatic properties but watching the video he did not cover that in his session. It is the simplest concept imaginable and hence it deserves a simple short blog entry.

In C#3, you can write code like this:
        public string Name
{
get;
set;
}
The compiler generates code like this:
        private string XX;
public string Name
{
get { return XX; }
set { XX = value; }
}
, where XX is not directly accessible to you in code of course. This only works for properties with both getter and setters.

Get the March CTP to try it out yourself.

Administrator in VS Orcas title bar

Mon, March 5, 2007, 04:11 AM under Orcas | VisualStudio | UAC
Anyone running on Vista knows about the new security feature of UAC. A known trick is to right click on a command window shortcut and select "Run As Administrator" to get an elevated command window.


Following that, anything you launch from the elevated cmd will also be elevated. Of course this can be dangerous so when a command window is elevated, it is prefixed with the word "Administrator" (so you can distinguish it from non-elevated command windows).


No other window on Vista will tell you in its caption that it is running as administrator. The reason for that is that you will not typically run an interactive process elevated for a long period of time plus most apps cannot do the accidental damage that an elevated cmd window can. Of course each application developer can decide for their own app what they want to do.

The VS Orcas team decided that they wanted to differentiate an elevated VS instance from a non-elevated instance. They do this by appending a "(Administrator)" string on the title as the following screenshot shows:


I like this, although I would have also liked some consistency between cmd and VS and in fact maybe some official Windows guideline that all apps follow.

Ctrl+Tab in VS Orcas

Sun, March 4, 2007, 09:46 AM under Orcas | VisualStudio
UPDATE: After Beta 1 I updated the screenshot below (you can still view the old one here).

A cute feature introduced in Visual Studio 2005 was that Ctrl+Tab didn't just cycle through the open windows but it also brought up a dialog that let you see what the next window would be (much like Alt+Tab does on Windows XP).

VS "Orcas" builds on that feature by offering a sneak image preview of the next window (much like Alt+Tab does on Windows Vista). Try Ctrl+Tab in your Orcas installation and you should get a window like the following:

Like I always say, the devil is in the details :-)

Code metrics in VS "Orcas"

Thu, March 1, 2007, 03:28 PM under Orcas | VisualStudio
One of the new menus I noticed when right clicking on the project menu was one titled "Generate Code Metrics".

I played with it and just before writing a long blog entry, I found that the feature team have done that already so to avoid duplication please go read all about it on the fxcop blog (plenty of screenshots there). The title of the menu gives away what it does but to whet your appetite, if you try to add/remove columns from the code metrics window you get the following dialog:

Now all we need is to make that dialog resizable :)

VS "Orcas" uses the new CommonFileDialog

Thu, March 1, 2007, 05:21 AM under Windows | Vista | Orcas | VisualStudio
Whenever I see an application on Vista that shows the old file dialog, I cringe (sorry, it is true). So given that I "live" in VS2005, it is the one that irritates me the most every day in that respect. It is easy to show it from native code and I have talked about the managed wrapper in VistaBridge before.

I've been waiting for a VS "Orcas" build that uses the new CommonOpenFileDialog when running on Vista and the March CTP does just that. All I can say is "WOO HOO".

Download the Orcas March CTP now

Wed, February 28, 2007, 04:25 AM under Orcas | VisualStudio
Finally, I can empty my queue of Orcas draft blog posts :-)
Get the installable bits here and the VPC image here.

1st March: Updated with screenshot.

Open Folder in Windows Explorer in Orcas

Wed, February 7, 2007, 04:33 AM under Orcas | VisualStudio
I discovered a small new feature in the Visual Studio “Orcas” IDE which I am already finding useful.

How many times have you had a Visual Studio solution open and you wanted to quickly open Windows Explorer and navigate to the folder of the solution or maybe the folder of the project or maybe the build folder (e.g. Bin\Debug)?

What I used to do with VS2005 is open a code file, right click on its tab and select “Open Containing Folder” (don’t tell me you didn’t know about that one!) and then navigate up/down to go where I really wanted to be. In particular, many times I would “Show All Files” in Solution Explorer, then expand the bin\Debug folder, open the pdb file in VS just so I could right click on its tab and select “Open Containing Folder” (sounds long winded but is actually much faster than any alternative):


Now with Orcas, life becomes easier. Simply go to Solution Explorer select the solution node or the project node (or even a bin/obj folder if you have shown all files) and then... right click:

Notice just above “Properties” the new menu item “Open Folder in Windows Explorer”? It does exactly what you expect it to (and yes, I know that I am easily pleased :-D)

BTW, if you want to assign a shortcut key to the command (via Tools->Options->Environment->Keyboard), its name is ProjectandSolutionContextMenus.Project.OpenFolderInWindowsExplorer.

"Orcas"

Wed, January 31, 2007, 03:35 PM under dotNET | Orcas | VisualStudio
This blog will get an additional focus over the coming months: "Orcas" :-)

Before Visual Studio 2005, .NET Framework v2.0, C#2, VB8 and CLR v2.0 shipped, they collectively had the code name "Whidbey".

As we know, recently the .NET Framework v3.0 shipped, which leaves intact the languages, CLR and existing Framework bits. It also continues to take advantage of the same VS2005 albeit with WF extensions (and no released tool bits for WPF & WCF).

Next, we are going to see an update to the Framework bits (v3.5), languages (C#3, VB9) and Visual Studio; collectively the update has the codename "Orcas". I will label/tag such topics as 'Orcas'. The "Orcas" release also includes a new version of the .NET Compact Framework (v3.5) along with new integrated Visual Studio for Devices enhancements. I will continue to tag/label those topics as 'Mobile and Embedded'.

Until now I’ve refrained from diving into "Orcas" for various reasons. I can tell you that even though the documentation doesn’t list Windows Vista as supported, I finally have the "Orcas" January CTP running fine on Vista both in VPC 2007 and directly installed. Stay tuned :-)

VS “Orcas” September CTP

Sat, September 30, 2006, 03:58 PM under Orcas | VisualStudio
One of the areas I will be focusing on as we move forward is the next version of Visual Studio code-named Orcas. So, when I got word last week (while on the road) that the 1st CTP was out, I couldn’t wait to come back home and play with it.

Unfortunately, it doesn’t look like I will be doing any playing :-( Not because this CTP doesn’t include all the LINQ bits or because it doesn’t include all the C# 3.0 bits or even all the VB9 bits. No, the reason I won’t be playing is because it is released as a VPC image that is not supported on Windows Vista. I just don't have any machines (or partitions) with XP on them (and quite frankly don’t want to ever go back to XP). Shame, as I was looking forward to playing with unit testing on devices and the other improvements for the NETCF developer.

Oh well, looking forward to the next drop and let’s hope there will be support for Vista (or that I decide to use Virtual PC 2007 Beta on Vista RC to test a CTP)!

If you can though, check it out and be one of the first to start blogging about what you like and what not. Download the Orcas September CTP here.

Display Full Signature

Wed, August 10, 2005, 12:35 PM under Whidbey | VisualStudio
It seems the promise is delivered in the Visual Studio 2005 June CTP.

The first clue is on the Class Diagram toolbar and menu.

With Beta 2 there is a menuitem (and toolbaritem) that reads "Display Member Types" and it can be on or off - to either display the return types of methods and the types of fields/properties... or not.

With June CTP, there are 3 options as the following screenshot shows:


For a VB example of what a class on a diagram looks like when we "Display Full Signature", click here.

Before I show you a more involved C# example let me share with you a tip: Since VS2005 allows you to reference assemblies built with VS.NET 2003, even if you are not planning on moving to VS2005 any time soon
, you can visualize the publics of your assemblies with VS2005; in other words, use VS2005 just for the Class Designer so you can draw your class diagrams!

So,
1. In VS2005 add a reference to OpenNETCF.dll
2. Switch to Class View and make sure "Show Project References" is checked
3. Drill in the Project References until you reach the namespace OpenNETCF.ComponentModel
4. Now right click on it and choose View Class Diagram

There you have it. A class diagram showing the BackgroundWorker and its friends :-)

I followed the steps above in a C# project and the results, with full signatures, are here.

GenerateMember

Tue, August 9, 2005, 12:27 PM under Whidbey | VisualStudio
If you look at the form designer generated code (InitializeComponent and friends), when you add a control to your form, you'll see that the control gets created, sized, positioned etc and then finally added to the Controls collection of the form. That is all fine and necessary, what is not always necessary is having a form level field that points to the control. It is an extra 4 bytes per member and more importantly clutters the code and intellisense (and any diagrams you auto generate).

In this area, there is a small enhancement that I loved when I first saw Whidbey and I don't think it has had enough coverage, so here goes.

In Visual Studio 2005, when having a form open, you can select a control and toggle a new boolean property from the properties window (under the Design category): Generate Member. As the documentation says, it "Indicates if a member variable will be generated for this component."

So for all those projects you have upgraded, go though the controls on your forms and check to see if you are accessing the control variable outside InitializeComponent; if you are not set GenerateMember to false. For new projects make sure you remember to make that decision every time you add a control to your form; e.g. most Label instances never get accessed after you set their Text in the designer.

Note that this is not a true property, i.e. you don't get programmatic access to it of the Control class. It is simply a design-time thing done via an extender no doubt.

ProjectProperties->Signing vs AssemblyInfo

Sat, August 6, 2005, 05:54 AM under Whidbey | VisualStudio
This has been on my "to blog" list but, since someone else beat me to it, please go read: Visual Studio 2005 and Signing with strong name keys.

Why is there a warning against using the old way of signing in the AssemblyInfo.cs? When sharing code between Smart Device and desktop projects, we used to share the AssemblyInfo file. Now, to strong name both projects/assemblies, I need to do it via two different project properties dialogs rather than a single code file!
Note that VB projects seem more tolerant to using the AssemblyInfo.vb for this purpose.

In addition, there is another bug with Beta 2. Say you created a desktop project and added the strong name (resulting in the silly copying of the snk file to your project folder). Now you create a Smart Device project in the same folder and using *its* project properties try to add the snk file from its original location: VS2005 dies a horrible death! The workaround is to browse to the snk file that was copied in your project folder.

Project properties nuisance

Fri, August 5, 2005, 12:54 PM under Whidbey | VisualStudio
Nobody likes modal dialogs, but the Visual Studio.NET 2003 properties dialog is *not* modal.

Nevertheless, we prefer docked windows (apparently), so in Visual Studio 2005 the properties window is "inlined" in the main area as if it were a code file.

With this change we lost a great usability feature. Easiest way to describe this is an example:
1. Open a VS2003 solution with more than 1 project (e.g. 3 or 10)
2. Collapse them all [btw, when are we going to get a "Collapse all" in VS?!]
3. Select a project and choose Project Properties to show the popup window
4. Select "Common Properties" -> "References Path"
5. Change the value(s) (or verify it is what you want)
6. Without closing the dialog, select another project in the solution
7. See how the “project properties” updates for that project?
8. Go back to step 4 and select some other section of the Properties dialog
9. In solution explorer, use the keyboard up/down keys to quickly verify that a setting is the same for all projects

I use the above all the time (e.g. to quickly toggle Debug/Release constants, change default namespace etc). When you change project selection, if you have made changes, you get the prompt to save or discard changes (which is nice).

So how can I achieve the same with VS2005? That wasn't a rhetorical question... please tell me!

For all projects in a VS2005 solution, try to change the output path from bin\Debug to bin\DebugCF. Count the number of clicks/mouse movements and do the same for VS2003 in no time.

How irritating when a great product takes a step backwards...

...or maybe I should get out more ;)

How to upgrade VS2003 projects to VS2005

Thu, August 4, 2005, 01:04 PM under Whidbey | VisualStudio
If in Visual Studio 2005 you try to open a project created with Visual Studio .NET 2003, the conversion wizard appears. Apart from the option to backup the existing solution, there isn't much more to it other than clicking the "Finish" button. It basically takes the project file (which is v7.1 or v7.0) and converts it to VS2005 (v8.0); all code files (.vb or .cs) remain untouched.

When you install VS2005 you can quickly tell in your file explorer which solutions were created with which version of Visual Studio, check out this screenshot.

Note that if you double click on a 7.x *project* file in explorer, you will be presented with the upgrade wizard in VS2005, whereas doing the same for a 7.x *solution* file, correctly opens it in VS.NET 2003.

So I was upgrading some VB device projects with Beta 2 and noted a few subtle differences between the *upgraded* VS2005 projects and *new from scratch* VS2005 projects of the same type. The differences are easier observed by opening the project files in notepad (or an XML editor) and comparing them (you know of course about MSBuild).

For example, the upgraded project has a bunch of empty tags (which are not needed): ApplicationIcon, AssemblyKeyContainerName, AssemblyOriginatorKeyFile, AssemblyOriginatorKeyMode, StartupObject and PreBuildEvent/PostBuildEvent under PropertyGroup under FileUpgradeFlags. It also has a bunch of tags with default values (whereas new projects omit them) or tags that don't apply to NETCF projects: DelaySign, OptionCompare, OptionExplicit, OptionStrict, RegisterForComInterop, RemoveIntegerChecks, TreatWarningsAsErrors, WarningLevel and Name/Private under Reference Include under ItemGroup.

Newly created projects will have the new properties structure I described previously here. You can observe this in the new files in the text editor with tags such as: AutoGen/DesignTimeDependentUpon under Compile Include for Resources.Designer file. Also for tags such as: Generator/LastGenOutput/CustomToolNamespace under EmbeddedResource Include for Resources.resx file.

Sooo...

If you still wish to go down the upgrade wizard path for your VB device projects, here are my recommendations for your project properties window:
1. Select Option Strict On
2. Select “Error” as the Notification for all Conditions except "Use of variable prior to assignment"
3. Check "Treat all warnings as errors"
4. Check "Generate XML documentation file"
5. Go to "Advanced Compile Options". On the "Generate debug info" combo, select "Full" (at least for a debug configuration) DebugType
6. Go to references and remove unused ones (Unused References->Remove)
7. Uncheck assembly COM-Visible [unless you explicitly want it to be visible]
8. If you want AssemblyInfo in its own folder, create one in the project and move it there.

Alternatively, if you want clean projects following the new style:
a) Create a brand new project in VS2005 (of the same type as the one you will upgrade)
b) Delete the default code file (e.g. Form1 or Class1 etc)
c) Copy attributes from the old AssemblyInfo file to the new one as appropriate
d) Copy settings from the old project properties to the new one as appropriate
e) Add references to the new project to match the old ones
f) Deal with resx files as discussed here

Finally, and continuing from my last point above, it makes sense that you upgrade your projects (one way or the other) bottom up. In other words, start with your class library that references nothing but framework assemblies and work the projects up to your Application (the exe). Note that VS2005 will allow you to reference assemblies built against v1 of the framework! So be sure you are referencing *upgraded* dlls and not the original/old ones.

AssemblyInfo 1.0.* -> 1.0.0.0

Wed, August 3, 2005, 09:24 AM under Whidbey | VisualStudio
In VS2005 the version number does not default to "1.0.*" like it does with VS.NET 2003. Instead it starts off with more sensible "1.0.0.0". You can check this for yourself by examining the AssemblyInfo file (or through the project properties and the "Assembly Information" button).

However, I would prefer a checkbox on the dialog (or a wildcard character in the file) that would result in auto-incrementing the revision part of the version. This is exactly what VS2005 offers for ClickOnce application and you can see that for yourselves by navigating to the "Publish" of the project properties dialog ("Automatically increment revision with each publish").

To be perfectly honest, what I would really like is to pass to the AssemblyVersion attribute the following parameter "1.0.*.0". I would then expect the build part of the version number to increment by one every day as it does now, to indicate the number of days since January 1st 2000. Alas, we cannot add anything after the *... maybe in Orcas!

Another use of partial types

Tue, August 2, 2005, 04:03 PM under Whidbey | VisualStudio
We've looked at partial types before but what use are they?

Their primary use is for code generation tools. The main/best example is the windows forms designer which uses them for splitting the designer code from the code we (the developers) write. I think that code generation will play an even larger part in every day development as years go by but that is another story...

Another use could be to split a class in privates and publics. So one file has all the (private) fields and private methods while the other has all the members that are externally callable.

You can take the previous idea too far and have a file per member category i.e. one for fields, one for methods, one for properties and one for events (or even another for internal types such as structs/classes/delegates).

If a class implements an interface (or many), why not split the interface implementation into its own file...

Some might even split a class into files according to the areas that different developers are working on (thus assisting with source control check ins/outs).

Finally, if you find yourself declaring your own code regions in VS.NET 2003, consider whether you can extract them into their own file using partial classes.

I am not advocating any of the above but I am not being a purist against it either. For the record, I do believe that classes should be controlled from growing too large; objects should be designed to do one thing only and do it well.

Recently I discovered another reason. A few years back, when I migrated a whole bunch of dotnet code to the compact framework, I came across types that while designed to do one thing only, they had a fatter interface than what appropriate for an embedded platform (and some of their members were simply not applicable to windows ce). There were a number of approaches I took depending on the situation:
1. "Carry" the extra class members but not call them
2. Conditionally compile parts of the class for the NETCF (or vice versa)
3. From a single class, extract a base abstract class and two specialisations (each in their own file). In the Smart Device Project I only use two files out of the three (the base class and only the one subclass that is applicable).

It is obvious where this is going, isn't it? :-)

A 4th option with Visual Studio 2005 is to use partial classes and thus exclude the files you don't want from one of the projects. One more support option for sharing projects between the two platforms.

My Project Properties

Thu, May 19, 2005, 03:23 PM under Whidbey | VisualStudio
With Visual studio 2005 the contents structure of Solution Explorer has changed. Even with VS2003 I always had the "Project->Show All Files" option turned on but with VS2005 it is essential (by default, they hide more than what they show!).

The main change is that under each project there is a folder (just above "References"). Amongst other things it contains the AssemblyInfo file (that previously was with all the other files). If you open the project properties and go to the "Application" tab you'll find a button called "Assembly Information" that brings up a dialog showing the AssemblyInfo values. If for whatever reason you’d prefer the AssemblyInfo file to live with the other code files, then simply drag it out; the project properties will still find it :-)

Under the same folder you'll find a Resources.resx file (and its dependent Resources.Designer). Again, you can manipulate this via the project properties and specifically the "Resources" tab. It is these files that enable My.Resources (and the Resources class in C#) wrapping the System.Resources.ResourceManager. If for whatever reason you’d rather not have these files, then right click on them and delete them (you can always regenerate them via the project properties “Resources” tab).

All of the above is applicable to projects targeting PC or devices and is true for both VB and C#. Of course, keeping the name of the folder the same for both languages would be sacrilege so in VB it is called "My Project" and in C# it is called "Properties".

Furthermore, only for desktop projects (you didn't think we'd have it all in the Compact Framework did you?), the folder also contains Settings.settings (and its dependent Settings.Designer) files. As you guessed, these enable the editing of settings in the project properties based on an auto-generated Settings (My.Settings in VB) class that inherits from System.Configuration.ApplicationSettingsBase). If for whatever reason you’d rather not have these files, then right click on them and delete them (you can always regenerate them via the project properties “Settings” tab).

Finally, only for VB desktop projects, the "My Project" directory contains the files: Application.myapp, Application.Designer.vb and ApplicationEvents.vb. These are responsible for the new startup model and application level events, which we looked at in the Beta 1 timeframe (it has changed slightly but the majority is identical and the changes are mostly cosmetic e.g. the option is now called "Enable Application Framework" rather than "Startup with custom Sub Main"). If you don’t want the ApplicationEvents.vb file, then simply delete it (you can always regenerate it via the button “View Application Events” under the Project->Properties Application tab). Whatever you do, *do not* delete the other two vb files; with Beta 2 at least, nasty things can happen (things that force you to use Task Manager -> End Task)! Having just said that, those two files are also present in Class Library projects even though the relevant project properties areas are disabled (!). In the class library case it seems safe to delete them.

Class Designer news

Wed, May 18, 2005, 02:57 PM under Whidbey | VisualStudio
Due to numerous fundamental omissions, the Class Designer has a long way to go before it can fully compete with existing modelling tools (although it already beats them hands down in some areas). The only devs who don’t see that are quite frankly those that haven’t used on a regular basis UML tools before (either due to not having the chance to do so _or_ because they tried and quickly quit due to the high UML learning curve).

Today, two posts in the class designer forums renewed my faith in the tool big time.
1) Full signature support in RTM (look for contribution by Ramesh on 18 May)
2) A cool open project that seamlessly adds a whole bunch of features (including showing all fields as associations for selected types). Shame about the gotdotnet choice Dmitriy, but you can’t have it all I guess :-)

Good stuff, thanks guys!

NoWarn or VB compiler options

Tue, May 17, 2005, 12:44 PM under Whidbey | VisualStudio
With VS2005, if you open the project properties of a VB project and select the "Compile" tab, you'll see a bunch of options.

[digression]Why did the VB team call it the "Compile" tab, whereas the C# team call it the "Build" tab? Although it is a rhetorical question, I'll answer it: Because the two teams do things differently for the sake of it! Consistency between the two is not only not a requirement, but probably looks bad at review time, so they avoid consistency as much as possible. Anyway...[/digression]

So you are on the "Compile" tab and you can choose between the None|Warning|Error notifications for each of the following 9 conditions (we'll see in a moment what the 5-digit numbers are after each one):
1. Implicit Conversion - 41999, 42016
2. Late binding call could fail at run time - 42017,42018,42019,42032,42036
3. Implicit type; call could fail at run time - 42020,42021,42022
4. Use of variable prior to assignment - 42030,42104,42108,42109
5. Function/Operator without return value - 42105,42106,42107
6. Unused local variable - 42024
7. Instance variable accesses shared member - 42025
8. Recursive operator or property access - 41998,42004,42026
9. Duplicate or overlapping catch blocks - 42029,42031

I will not explain each one here, because I hope they are self-explanatory. When you turn On Option Explicit and Strict you'll see that the top 3 are automatically set to Error.

So that leaves the remainder 6. I advise you to set the last 5 to Error; I cannot think of a reason why you would not want to correct issues caught by the compiler - if you have come across a reason, please debate it with me.

So we are now left with Use of variable prior to assignment: Set this to None. The feature is not complete and I have left comments here and submitted the bug here, to no effect. I guess you could turn it on and see if it has caught anything useful and, after wading through a sea of false positives, turn it off again. But this is literally a waste of time.

Finally, let's see what the 5-digit numbers are about. The VB compiler has more than 9 settings; in fact it has at least 24 (represented by the 5 digit numbers). When you make changes to the project properties' tab as discussed above, if you open the vbproj in notepad you'll find a NoWarn tag. Within that tag the series of numbers represents your choices. By enabling one warning at a time, saving and then examining the file, you'll come up with the mapping I have above, e.g.:
<WarningsAsErrors>41998,41999,42004,42016,42017,42018,42019,42020,42021,42022,42024,42025,42026,42029,42031,42032,42036,42105,42106,42107</WarningsAsErrors>
<NoWarn>42030,42104,42108,42109</NoWarn>
The second line instructs the compiler not to bother warning us about possible null reference exceptions. The first line tells it to set all other warnings to errors (this is separate to the "TreatWarningsAsErrors" tag that acts independently on a more generic level).

One question still remains. Why, in some cases, there is more than one number corresponding to a setting? The answer must be because there is finer grained control available that the VB project properties dialog is not offering (in fact, in the C# project properties you can freely enter the corresponding set of C# compiler numbers). Yet another tradeoff between simplicity (i.e. nice UI) and flexibility (i.e. full control).

Attributes in properties of code file

Fri, May 6, 2005, 10:57 AM under Whidbey | VisualStudio
The more I use VS2005 Beta 2 the more I come across (little) new things.

Make sure you have the properties window open/docked (you know, the one where you usually change the properties of controls).

Open a code file (i.e. a class) and place the cursor on the class declaration. Look in the properties window. You can toggle the 3 boolean combobox options to insert/remove the 3 corresponding attributes: COM Class, COM Visible and Serializable.

This appears to be a VB thing only. It's been a while since I said that in a positive way :-)

Now, would the VSD (Visual Studio for Devices) team please remove the Serializable option, as it does not apply to CF?

CLSCompliant now works

Tue, May 3, 2005, 02:02 PM under Whidbey | VisualStudio
VB Class Library projects are marked at the assembly level with CLSCompliant (while in C# you have to add it yourself). The most important reason for turning it on in your C# library projects is so that you don't accidentally expose case sensitive *publics*; not only this is not CLS compliant, but it would render your assembly unusable by VB code.

So, while it is bizarre that the option is not turned on for C# by default and it is for VB, it makes no difference because it has no effect for VB projects! The situation changes with Whidbey, where suddenly it works as expected. I guess it got noticed when VB got support for unsigned types (also not CLS compliant).

How did I find out? Some of my assemblies are exposed to VB6 clients, so I have public interfaces starting with an underscore (representing the default interface) and other starting with double underscore (representing the default events interface). When I upgraded them to VS2005 B2, I got a whole bunch of CLS compliancy errors (no public types may start with _). BTW, my solution was to mark them as CLSCompliant(false) rather than tweak the public interfaces and then have to modify all clients too.

FYI, with Whidbey, the C# team persists with their choice of not marking the C# projects with the CLSCompliant attribute by default... is that arrogance?

Synchronize Class View

Mon, May 2, 2005, 11:59 AM under Whidbey | VisualStudio
When in the code editor of Visual Studio, one of the items I use most on the context menu is the "Synchronize Class View" menu item. As you expect/know, it activates the "Class View" docked window, expanding the tree nodes as appropriate and selecting the item which you have the cursor on in the code. I love this feature, and my jaw dropped when I couldn't find it on the VS2005 context menu!

I quickly went through the top level menus and their children trying to find where this option lives; no joy. Since every action in VS has a keyboard shortcut, I thought I'd go to the Tools->Options->Environment->Keyboard and see if I can find it that way. Lo and behold, it appears as the 5th item in the auto-filtered list as soon as I type "Sync": View.SynchronizeClassView. I cancel the Options dialog with a smile :-)

Armed with this knowledge (i.e. that the option lives under View), I can add the option to the context menu. Here are the steps, if you wish to do the same:
1. Select Tools->Customize
2. On the Toolbars tab, check the "Shortcut Menus" item
3. Observe how 6 drop down menus appear on the toolbar, the first one being "Editor Shortcut Menus"
4. Still in the Customize dialog, select the "Commands" tab, select "View" on the left and locate on the right the "Synchronize Class View" item.
5. You can now drag the item to the "Editor Shortcut Menus" and drop it wherever you want (I placed it on top of "Go to Definition")
6. Close

Editor life is back to normal again...

New Compilation Constants

Sat, April 30, 2005, 05:45 PM under Whidbey | VisualStudio
Dotnet projects have at least two configurations: Debug and Release. Part of the configuration is the definition of two compilation constants: DEBUG and TRACE. For Debug configurations, both constants are on; for Release, only TRACE is on. I always turn TRACE off as well, and I advice you to do the same (however, that is not the point of this blog entry).

You can tweak these in your project properties (they are represented by checkboxes) and you can also add your own in the textbox offered or you can define them in code (#define or #const, depending on your language of choice). An example of why you would add a compilation constant is for cross platform development, as detailed before.

For conditional compilation you use #if. In C#, the code that does not apply gets greyed out. This is really sweet and somehow I thought it was added to the VB2005 IDE, but unfortunaly I realised recently it wasn't :-(
Go vote for it (maybe it will make the Orcas release).

In VS2005 we find a few additional conditional compilation symbols that are not in VS.NET 2003 (applicable or not, based on what project type you chose and what language you are developing in):
DEBUG
TRACE
CODE_ANALYSIS
PocketPC
WindowsCE
Smartphone
TARGET
CONFIG
VBC_VER
_MyType

I'll let you figure out what each one is used for and the potential values they can have ;-)

Tiny (but positive) change

Fri, April 29, 2005, 01:09 PM under Whidbey | VisualStudio
Just noticed a infinitesimal change in VB code with Whidbey that will make copying pasting from C# to VB and vice versa require one less thing to look for.

As you know, code for properties in VB is autogenerated:
Public Property SomeProp As String [hit enter here]

The setter looks like this in VS.NET 2003:
Set(ByVal Value As String)

In VB2005 Beta 2 it looks like this:
Set(ByVal value As String)

Seems like the VB team had their ear pulled by the coding/naming guidelines department :-)

February CTP

Thu, March 31, 2005, 12:06 AM under Whidbey | VisualStudio
We know the February CTP contains older device bits than the November CTP, but since the DVD arrived through my letter box I thought I'd install it (yes I have better things to do but I was curious alright :-)

My goal was to find 5 things I didn't know about (not necessarily new in this CTP) *and* they should not be CF-specific.

1. PropertyGrid control. I hadn't noticed that this is now part of the default toolbox for winforms. BTW, if you want to use it today with VS2003, see this.

2. Object Test Bench for VB :-) They told me they would not do it. If you've got the Feb CTP, go play with it (e.g. follow the C# steps described here).

3. This has been true since Whidbey went public, but I only just noticed it. If in a C# project (or with VS not having any project loaded), you open a VB file, its regions are recognised :-) [This always pi**es me off with VS2003]. A related nice option is "Tools-Options-Text Editor-File Extension"

4. You know about partial classes. Well, VB still doesn't show us the constructor in the file we edit by default (like C# does) :-(

5. Select the menu "Class Diagram-Display Types". I guess this is a tiny step closer to having method signatures but until that happens... Anyway, there are other reasons to moan about once you observe how this is implemented in C# as opposed to VB. The way I see it, this is another blow for VB developers.
"You cannot cope with UML notation for return types, which is simply replacing 'As' with ':' *but* C# developers are perfectly capable even though the change is larger (moving the return type from the front of the method name to the back and precede it with a colon)."
As a UML shop through and through, this is yet another reason for us not to use the Class Designer (or to ditch VB for any new projects).

Filter Exceptions

Thu, February 17, 2005, 06:31 PM under Whidbey | VisualStudio
Right click on the Output window in VS.NET and you get a lame contextmenu with 3 options: "Copy", "Clear All" and "Go To Error/Tag".

In April 2002 I requested that we are given the ability to exclude first chance exceptions from the output window.

Finally, 3 years later we get what I asked for :-)
Unchecking the "Exceptions" menuitem should turn first chance exceptions off.

It also looks like the Debug->Exceptions dialog has had a face lift...

ObfuscationAttribute

Mon, January 17, 2005, 10:11 AM under Whidbey | VisualStudio
This is the title of a blog post that immediately got my attention. I had to dig further, so here is the process.

Look at the attribute with a decompiler:
[AttributeUsage(AttributeTargets.Delegate | (AttributeTargets.Parameter | 

(AttributeTargets.Interface | (AttributeTargets.Event |
(AttributeTargets.Field | (AttributeTargets.Property |
(AttributeTargets.Method | (AttributeTargets.Enum |
(AttributeTargets.Struct | (AttributeTargets.Class |
AttributeTargets.Assembly))))))))),
AllowMultiple=true, Inherited=false), ComVisible(true)]
public sealed class ObfuscationAttribute : Attribute {
// Constructor
public ObfuscationAttribute();

// Properties
public bool ApplyToMembers;
public bool Excludet
public string Feature;
public bool StripAfterObfuscation;

// Fields
private bool mApplyToMembers;
private bool mExclude;
private string mFeature;
private bool mStripAfterObfuscation;
}

If you think drilling deeper will tell you anything, don't hold your breath; the properties are plain accessors for the fields and this is the ctor:
public ObfuscationAttribute(){

mStrip = true;
mExclude = true;
mApplyToMembers = true;
mFeature = "all";
}

OK, so the class itself doesn't unveil the mystery, but maybe applying it to one of our methods and then examining that will:
[System.Reflection.Obfuscation()]

public int ObfuscateThisPlease() {
int j = 6;
int i = 5 + j;
return (j - i);
}

.method public hidebysig instance int32 ObfuscateThisPlease() cil managed
{
.custom instance void [mscorlib]ObfuscationAttribute::.ctor()=(01 00 00 00)
// Code size 10 (0xa)
.maxstack 2
.locals init ([0] int32 j,
[1] int32 i)
IL_0000: ldc.i4.6
IL_0001: stloc.0
IL_0002: ldc.i4.5
IL_0003: ldloc.0
IL_0004: add
IL_0005: stloc.1
IL_0006: ldloc.0
IL_0007: ldloc.1
IL_0008: sub
IL_0009: ret
} // end of method Program::ObfuscateThisPlease

Nada. Tzifos. Nothing. At this point there is only one thing left to do: RTFM, and all is revealed:
"Instructs obfuscation tools to take the specified actions for an assembly, type, or member."

Well I bet, like me, you guys (and gals) were hoping System.Reflection.ObfuscationAttribute would be a pseudo-custom attribute rather than just a marker for 3rd party tools, but not every journey leads to a treasure :-(

I guess I could be applying it to all my privates automatically since, as we know, custom attributes cost absolutely nothing, until you explicitly reflect on them.

(Just to get this out of my system: I think the term Attribute is an unfortunate choice by the .NET designers. "Annotation", "decoration", "declaration", “metadata” or anything else would have not only conveyed the purpose better, but would also not clash with the UML's existing use of the keyword "attribute" to mean fields/data_members of a class)

DV Sample

Thu, January 6, 2005, 02:16 AM under Whidbey | VisualStudio
As the sample I promised, I have written a visualizer for System.String. Given a string variable, it will show the bytes corresponding to that string based on the various encodings. The inspiration for it was the cry that a friend of mine got from their QA team recently regarding an app they have that "Doesn't work on a Chinese OS!".

To create it, we need a class library project that references Microsoft.VisualStudio.DebuggerVisualizers.dll and we add the following code:

1. Declare the attribute:
[assembly: System.Diagnostics.DebuggerVisualizer(

typeof(EncodingVisualizer.StringBytes),
Target = typeof(System.String),
Description = "Encoding Viewer")]

The above is all you need to enable the new menu item when you hover over a string variable (or in the Autos window). In the IDE, the menu looks something like this. Note how VS2005 gives us out of the box the HTML, XML and TEXT visualisers.

2. The code that runs when the "Encoding Viewer" menuitem is clicked, is in your class:
using Microsoft.VisualStudio.DebuggerVisualizers;

namespace EncodingVisualizer {
public class StringBytes : DialogDebuggerVisualizer {
protected override void Show(IDialogVisualizerService windowService,
IVisualizerObjectProvider objectProvider) {
string s = (string)objectProvider.GetObject();
frmStringBytes f = new frmStringBytes(s);
f.ShowDialog();
}
}
}
Naturally, you need a form frmStringBytes whose visual design looks like this; the constructor of the form does the work and is straightforward:
public frmStringBytes(string aString)

: this() {
txtExpression.Text = aString;

string s;
byte[] arr;
arr = System.Text.Encoding.ASCII.GetBytes(aString);
s = "ASCII = " + BitConverter.ToString(arr);
s += "\r\n\r\n";

arr = System.Text.Encoding.Unicode.GetBytes(aString);
s += "Unicode = " + BitConverter.ToString(arr);
s += "\r\n\r\n";

arr = System.Text.Encoding.Default.GetBytes(aString);
s += "Default = " + BitConverter.ToString(arr) + "\r\n";

// Do other encodings here e.g UTF7, UTF8, UTF32 etc

txtValue.Text = s;
}
You may download the dll and place it in the right place as discussed before.

Debugger Visualizers in Nov CTP

Tue, January 4, 2005, 05:26 PM under Whidbey | VisualStudio
Apart from Tracepoints (as hinted at the last sentence of that post), the most exciting debugging enhancement in Whidbey is the Debugger Visualizer support. If you are already familiar with VS2005 Debugger Visualizers, here you'll find what has changed with the latest Community Technology Preview (btw, the Dec is not the latest CTP from a framework version perspective, the Nov one is). If you are not familiar with the feature, I suggest you follow these links [ 1 , 2 , 3 , 4 ] and note the changes from previous versions detailed below:
1. The assembly reference must be to: Microsoft.VisualStudio.DebuggerVisualizers
2. The DebuggerVisualizer attribute ctor doesn't need the 3rd param i.e. delete the VisualizerUIType parameter as all visualizers are modal now.
3. Your class that implemented the Show method of IDebugVisualizer should now inherit from DialogDebugVisualizer and override the Show method; the signature for this now is:
void Show(IDialogVisualizerService, IVisualizerObjectProvider)
Of course, you need to imports/using System.Diagnostics and Microsoft.VisualStudio.DebuggerVisualizers; the location for visualizers (assemblies/dlls) is still the same: "My Documents\Visual Studio\Visualizers" or "[VS8]\Common7\Packages\Debugger\Visualizers"

That's all. If you didn't know about Debugger Visualisers and have downloaded the Nov CTP, follow the links at the top (and below), download their samples, make the appropriate changes and have fun!

Next time I'll implement a DebuggerVisualizer (not an Image Visualizer, which you can get here, here and here) so you have a complete sample to download.

December CTP failure

Fri, December 24, 2004, 03:58 PM under Whidbey | VisualStudio
---------------------------
Microsoft Visual Studio 2005 Beta 2 Setup
---------------------------
Error 1305.Error reading from file d:\vs\Program Files\Microsoft Visual Studio 8\SDK\v2.0\Bootstrapper\Packages\InstMSI\instmsiA.exe. Verify that the file exists and that you can access it.
---------------------------
Retry Cancel
---------------------------

I have been trying all day to get the December CTP installed. Every sinlge time the message above halts the show. Yes, the file (and the instmsiW.exe) are both present on the C hard drive and the D dvd drive. The one on the C drive seems to be used by something because it will not let me delete/rename/overwrite it. Maybe there is already too much alcohol in me, but the fact is I can't see a solution and am giving up :-(

Merry (hic) Xmas!

November CTP

Fri, December 17, 2004, 02:01 PM under Whidbey | VisualStudio
As you should be aware by now, there is a November CTP out (I learned about it here). Thought I'd briefly share some experiences on the sleek VS2005 Standard Edition.

The install went though OK, including launching VS. Creating a project was not so smooth though; some error about System.XML being corrupt. Repaired the installation and tried again: bingo! So now I do my usual thing of creating one of each Windows App and NETCF app (in both C# and VB) to see if it is worth continuing and yes, it all worked. Then turned my focus to CF projects only (if you are asking "why", welcome to my blog :-).

First noticeable omission compared to the Beta 1 (the October CTP escaped me), is Deploy to My Computer! Where has it gone? That was way cool (previously mentioned it in passing here - penultimate paragraph) and I hope it will come back before Whidbey RTMs. UPDATE: If you also want this feature back, GO VOTE FOR IT NOW (it has been cut and is not on the list for RTM.

Looking into the above further, I actually try to execute a CF exe on the desktop and it fails to find the right assemblies (exception and death). This also worked before and works today with VS2003! So I move the exe to the actual directory where the CF assemblies are, and now it works... interesting.

Major setback now: I cannot debug with the emulators (I am running XP in a VPC). This worked in Beta 1, so it is either a step backwards or something wrong with my installation. Just running up the emulators works fine, by the way. Taking that last step further, I decide to manually copy the exe to the emulator (even a plain deploy with VS doesn't work). I can now run the exe and have a play with it (after also copying the CF 2.0 cab and installing it, of course). BTW, sharing files is made much easier with the direct option to have a "Shared Folder" in the options of the emulator; it then appears as "Storage Card" in the image. UPDATE: Got emulator debugging working with thanks to Amit Chopra (Brian Chamberlain really).

Next thing to examine are the NETCF framework assemblies in ILDASM (yes I like Object Browser and other tools but I prefer exploring what's new through ILDASM - call me crazy). I like what I see, but this is not the purpose of this blog entry. I find a couple of areas of particular interest and decide to drill into them (as in look at the implementation of the methods). No IL!!! All methods have a code size of 1, which is the ret statement. What's going on here? I open the CF assembly I just created and, sure, I can see the IL fine. Also fine are the desktop framework assemblies. I must be missing something here but I have never encountered this before, so if anybody has any clue please share. UPDATE: Turns out with this release the CF assemblies on the desktop are just designer shims and have no real code in them; the workaround for examining non-publics and implementations is to copy the files from the device to the desktop and disassemble them - thank you to Mike Zintel and his team for pointing this out. BTW, if you don't fancy copying the files and can cope with unfriendly file names, just extract the appropriate cab files directly on your PC :-)

I'll update this entry with any relevant info, but that's all for now. Next time we'll see a cool addition to CF 2.0 that was not in the Beta. At some future date I will cover Generics, which are also available in this build.

My.IsNot.For.Me

Thu, November 4, 2004, 03:59 PM under Whidbey | VisualStudio
If you are not familiar with the new My feature of VB2005, please go read about it and make your own mind up. I suggest reading my previous entry (in addition to the two links I offer there also check these out [1,2])

So it is clear that we are talking about:
1. A speed dial into the framework
2. Application events
3. Stuff generated at compile time into your project

My opinion is that the first one is a waste of space. Speed dial?! They could have given us this as example code and be done with it (or invest the energy to improving the help/navigation system). Yes the framework is large and some times discovering some methods may take longer than what it should, but how does having a parallel framework help? Now I have two frameworks to learn! We don't need YAF (yet another framework). The process of discovering the framework is called "becoming a .NET developer". While searching for a solution to a problem, the developer discovers not only the correct namespace/class/method but also a bunch of other classes/methods that they will not have to search for next time they have a different problem. The My feature discourages this behaviour and hence hinders learning the framework (which can only be a bad thing).

I wasn't too thrilled with VB.NET 2002 when I discovered all those "global" functions that come as part of Microsotf.VisualBasic.dll However, there is a major difference with those: they are necessary for smooth upgrade of VB6 code by tools (and some parts of it actually offer functionality not found in the framework). VB2005 takes the VB6 approach of having global functions everywhere and repackages them in a structured library. Structured or not, it is still a bunch of globals that existing .NET devs did not need (globals=statics.. err sorry I meant shared). In case it is not clear yet, My is a bunch of stateless operations that offer functionality already available in the framework. It is obvious the feature was added to lure VB6 devs that have not yet moved to .NET, but is My really helping them in the long run?

Application events as a concept are a nice idea. Will I use them in VB? Unfortunately the answer is no. Not only I am not too fond of having to give up my own Sub Main, but more importantly they will not be supported in CF 2.0

I haven't made my mind up on whether I like the 3rd part of My. On the face of it, it seems dirty, but only time will tell.

To finish off with a sweeping comment on the whole of the My feature: it is nowhere near in the same league as refactoring (that will not be part of Whidbey) and I would like to talk to the person that was responsible for prioritising these features (not that it will happen, but it doesn't hurt to ask:-).

I had written the above and then came across a post with a similar ending to mine.

Invoke with Whidbey

Fri, October 1, 2004, 05:30 AM under Whidbey | VisualStudio
Last time we looked at Control.Invoke on both CF and full framework. Assuming you have read it, let’s look at VS2005.

On the desktop, if you forget to use Control.Invoke, you now get an InvalidOperationException with the Message: "Illegal cross-thread operation: Control 'SomeControlName' accessed from a thread other than the thread it was created on." That is cool, and the stack trace will of course point you to the culprit. Note this only works when debugging in the IDE, and is not available to CF projects. Instead, with Smart Device projects, you get the (catchable) System.NotSupportedException (with the Beta 1 bits).

CF 2.0 brings parity with the desktop; all 3 limitations are removed, so you don't need the ThreadPool or the Queue or the need to cast:


// ...or any other type/params you want
delegate void SomeCustomDelegate(object o);

// This method runs on a non-GUI thread e.g. Threading.Timer
internal void OnNonGuiThread(Object o){
// if you have more than one argument just add it to the array
object[] arr = {o};

// assuming all this code is in a form
this.BeginInvoke(new SomeCustomDelegate(UpdateBox), arr);
}

// This method runs on GUI thread
private void UpdateBox(Object o
/*other arguments as defined by SomeCustomDelegate*/){

// TODO use o and other arguments
this.Text = o.ToString();
}


Ladybug Suggestions

Wed, September 22, 2004, 03:43 PM under Whidbey | VisualStudio
If you are playing with VS2005 you must be familiar with the MSDN product feedback center. Anybody can basically make suggestions for enhancements and also report bugs (it goes without saying that the two are not the same thing)

When I first met it, I thought this was a great idea and immediately starting using it for bug reports and suggestions. Now I am not so sure. The cynic in me has started to believe that the feedback center is there to gather our input for the next version of .NET (i.e. not Whidbey but Orcas). I do hope that is not the case and I will keep using it. I reserve final judgment for when the product ships.

The reason I have started having doubts is the number of suggestions that get 'postponed', 'resolved as won't fix' etc. Just randomly browse through the suggestions made and note how many are actually taken on board. Browsing through bug reports reveals that actually MSFT have already caught most of the bugs that we report. The few additional ones that have slipped their net seem to get attention (unlike the suggestions we file).

If you know of any suggestions that have made it into the product do let me know. Naturally suggestions that they had already decided to make don't count (usually these are stated as "Thank you for your suggestion this is how it works in our current builds").

Here is the list of suggestions I was tracking that are postponed [1,2,3,4,5,6] and here are the outstanding ones [1,2,3,4]. Not to mention the 10 postponed suggestions on the Class Designer (detailed in a previous entry)

As I said, my bug reports have all been addressed except for one which is resolved as won't fix; still fighting it.

A couple of other blog entries on the same theme are [1,2]

Rant over :-|

Partial Classes (CF & Full FX)

Fri, September 17, 2004, 02:26 AM under Whidbey | VisualStudio
If you create a new Windows Application project in VS2005 you'll notice that viewing the code for the Form1 class shows very little. All the designer generated code is missing. If you then "Show All Files" in the solution explorer, you can see under the Form1.cs file a Form1.Designer.cs file which upon viewing reveals the designer generated code in yet another Form1 class. If you build the project and look into the assembly with ILDASM, you notice exactly one Form1 class and no indication about this split. The clue to the whole mystery is the keyword "partial" before each class declaration (in fact VB allows one class not to be declared as partial so you'll only see "Partial" in the Form1.Designer.vb file).

So this is a tool thing. You can split a class over multiple files in the same project, as long as you declare them as partial. With forms, note that adding event handler methods or any other methods that you write, appear in the main code file.

To complete the story of how the solution explorer links the two in the manner that it does, we simply look at the .csproj/vbproj file in Notepad or your favorite XML editor. Under the ItemGroup tag you find something like this:

    <Compile Include="Form1.cs">

         <SubType>Form</SubType>
    </Compile>
    <Compile Include="Form1.Designer.cs">
        <DependentUpon>Form1.cs</DependentUpon>
    </Compile>

It is the DependentUpon tag that makes a file appear under another in VS. It is being put to very good use with Partial classes.

So here is a money making thought (and you don't even have to turn adsense on). Write a tool/addin that will create these entries. MSFT is not offering anything in the IDE apart for forms, so it is down to tedious manual work at the moment. If I were using it, I'd wish for a menu item when I right click on a code file that offers: "Add Partial". So if I used it on a SomeClass.cs, it would ask me for a name XXX and then create a partial class SomeClass.XXX.cs under SomeClass.cs. The greatest use of this tool would be for upgrading existing projects. When upgrading, VS2005 does not split Form classes, so you have to do all the work manually if you want to fit in with the new environment. Oh, and if you need Beta testers, count me in :-)

C# with MyEvents functionality

Fri, September 3, 2004, 05:15 AM under Whidbey | VisualStudio
If you are not aware of the MyEvents functionality that VB2005 offers, check out a screenshot and short description here.

The question is how to get the same support in C#. Well it all becomes pretty straightforward if you understand how MyEvents and the new startup model work in VB. I provided an exploration here.

So, armed with that knowledge, in a new C# Windows Application do the following:
1. Add a reference to Microsoft.VisualBasic.dll
2. Replace all the code in Program.cs with the 35 lines of code given below
3. Form1.cs. This is the main form (you could put a button that throws an exception)
4. Add a form Form2.cs. This is the splash screen, no code needed.
5. Build in release mode and run from explorer.

Here is the code:
namespace WindowsApplicationCSusingVB{

public class MyApplication :
System.Windows.Forms.WindowsFormsApplicationBase{

public MyApplication():
base(System.Windows.Forms.AuthenticationMode.Windows){

base.NetworkAvailabilityChanged += new
Microsoft.VisualBasic.MyServices.NetworkAvailableEventHandler
(this.MyApplication_NetworkAvailabilityChanged);

base.Shutdown +=
new System.Windows.Forms.ShutdownEventHandler
(this.MyApplication_Shutdown);

base.UnhandledException += new
System.Windows.Forms.UnhandledExceptionEventHandler
(this.MyApplication_UnhandledException);

base.Startup += new
System.Windows.Forms.StartupEventHandler
(this.MyApplication_Startup);

this.IsSingleInstance = false;
this.EnableVisualStyles = true;
this.ShutdownStyle =
System.Windows.Forms.ShutdownMode.AfterMainFormCloses;
}

protected override void OnCreateMainForm(){
this.MainForm = new Form1();
}

protected override void OnCreateSplashScreen(){
this.SplashScreen = new Form2();
}

private void MyApplication_NetworkAvailabilityChanged(object sender,
Microsoft.VisualBasic.MyServices.NetworkAvailableEventArgs e){

System.Windows.Forms.MessageBox.Show("network");
}

private void MyApplication_Shutdown(object sender, System.EventArgs e){
System.Windows.Forms.MessageBox.Show("shutdown");
}

private void MyApplication_Startup(object sender,
System.Windows.Forms.StartupEventArgs e){
System.Windows.Forms.MessageBox.Show("startup");
}

private void MyApplication_UnhandledException(object sender,
System.Windows.Forms.UnhandledExceptionEventArgs e){
System.Windows.Forms.MessageBox.Show(
e.Exception.StackTrace, e.Exception.Message);
e.ExitApplication = false;
}

internal static void Main(string[] Args){
(new MyApplication()).Run();
}
} //end class
} //end namespace

VB2005 Magic – Application Startup and MyEvents

Wed, September 1, 2004, 10:20 AM under Whidbey | VisualStudio
With VS2005, VB gets the My feature. Part of the package is a new startup model and MyEvents.

If you look in a VB project properties, you will find a (unchecked by default) checkbox "Startup with custom Sub Main". Below it there are more "Windows Application Properties", including choosing a Splash screen. There is also a button "View Code" which takes you to the partial MyApplication class - you can also go there by showing all files in the solution explorer and navigating to the MyEvents.vb file under My Project. By using the dropdown you can hook into various events e.g. Startup, UnhandledException etc. So how does this work?

Well the first thing to note is that, if you check the "Startup with custom Sub Main" (and provide your own Sub Main OR use the implicit one of a Form1), then none of the events will be caught, so obviously the two are intertwined. Second, if you use the Class Designer to drag the MyApplication class on a diagram and then display the full hierarchy, you will find that it inherits from WindowsFormsApplicationBase (WFAB), which in turn inherits from ApplicationBase. All of these are in the System.Windows.Forms namespace but are defined in the Microsoft.VisualBasic.dll

To continue the exploration, we build a simple VB WindowsApplication in Release mode and place a Trace.Assert(False, “stack") in its Form.Load event handler. After running the app, we see the stack trace in a msgbox that uncovers the startup call path. Usually we'd expect to see our Sub Main function followed by Application.Run and then a whole bunch of other methods (not of interest right now) ending up in Form1_Load. Instead, we notice that the call stack starts with:
MyApplication.Main -> WFAB.Run -> WFAB.DoApplicationModel -> WFAB.OnRun -> Application.Main etc.

And those methods are where the magic is.
OnRun does the following:
-sets the MainForm to be your main form (via OnCreateMainForm)
-hides the splash screen
-sets up the NetworkAvailabilityChanged event
-calls Application.Run

DoApplicationModel does the following:
-shows the splash screen (via OnInitialize)
-Raises the Startup event (via OnStartup)
-calls OnRun (just described above)
-raises the Shutdown event (via OnShutdown)

So how does all this affect the startup performance of VB apps compared to C#? I don't have that answer, but if you go and look in the methods above, you will find a whole bunch of other objects getting created (relative to thread safety, security etc). Also take into account the call path for the creation of MyApplication, e.g. it is in the WFAB.ctor that the StartupNextInstance event gets hooked.

Finally, a separate note on the UnhandledException event: This is setup in DoApplicationModel by hooking into the Application.ThreadException event. DoApplicationModel can also raise the UnhandledException event as a result of an exception occurring around (effectively) Application.Run. We know that there are 3 actions one must take to catch all unhandled exceptions, instead here we see only two! So it is obvious that the AppDomain.UnhandledException has to be separatelly subscribed to by the developer (for catching thread exceptions other than the GUI). I think this is a gotcha and the VB team should also hook into it so that when we catch the UnhandledException in MyEvents.vb we really are catching all unhandled exceptions.

Next time we'll look at the possibility of using this approach (including catching the events) from C#.

Class Designer - The Missing

Thu, August 26, 2004, 10:30 AM under Whidbey | VisualStudio
UPDATED the status of the suggestions on ladybug

Previously in the overview of the Class Designer I focused on the good aspects.

I did not mention two tracking windows that I am not that excited about but you might be, so I'll briefly summarise them.

Each time a shape is selected/clicked in the diagram, there are two windows that get updated: Properties and Class Details (in my configuration on the bottom right and bottom respectively). Class Details is a breakdown of the elements in the shape for finer editing. However, I'd rather double click on the shape and go straight to code where the excellent code editor/intellisense will help me make my change, then Ctrl+TAB and I am back in the diagram. The Properties window shows info already on the diagram (e.g. method name, access modifier), it shows info that should be on the diagram (e.g. method signature, type, whether it is static) and it shows info that I wouldn't mind going to code to see (e.g. Custom Attributes, remarks, summary). I would probably be more enthusiastic about these windows if I didn't know that the development time taken to offer us these could have been used to plug more essential gaps that are there due to "resource constraints".

Talking of gaps in functionality here is a list of features that would greatly improve the tool. They are over at the MSDN Feedback center as suggestions where the problem and proposed solution for each are described.

1 (POSTPONED) Show Full method signature for methods, events, delegates, overloads
(a must have feature whose ommission makes the whole Class Designer almost useless IMHO)

2 (POSTPONED) Support a dependency association
(read my justification for this... it is one of the least appreciated yet most useful of UML IMO)

3 (POSTPONED) Static members should have visual indication on diagram

4 (POSTPONED) Visual distinction of readonly properties

5 (POSTPONED) Event as association and How to show subscription to an event

6 (FIXED) Delegate signature

7 (POSTPONED) Delegates (and other nested types) shown outside the class

8 (POSTPONED) Visual representation/distinction of Namespaces

9 (POSTPONED) Attach notes to classes and associations at least

10 (FIXED) "View in diagram" should not always create a new diagram

11 (POSTPONED) Navigation aid for large class diagram

12 (FIXED) "View in diagram" framework types from Object Browser

13 (POSTPONED) Option to use .NET framework types instead of language types

Class Designer - The Good

Wed, August 25, 2004, 11:05 AM under Whidbey | VisualStudio
So VS2005 brings with it a great feature: the Class Designer.

For those of you unfamiliar with UML, think of it as a diagrammatic compliment to the Object Browser and Class View.

If you are familiar with UML (and its 8-9 diagram types), think Class Diagram but MSFT are going their own way with a slightly different notation.

Classes (reference types) and interfaces are represented by rounded-corner box shapes, and Structures/enumerations (value types) are represented by square boxes. Abstract classes are shown with a dotted line. Each box has up to four sections: Fields, Properties, Methods and Events. This is a great improvement over UML, where you just have 2 sections for attributes and operations; representing anything else requires stereotypes and/or other custom mechanisms. Each member can individually be hidden. Furthermore, each section is collapsible, as is the class as a whole; from a usability point of view this is done easier than in any other tool I have used!

The other item available from the toolbox is a square yellow note for adding comments in free format. While on the subject of color, it is used as a further aid in distinguishing elements on the diagram: classes/structs are blue, delegates red, interfaces green and enums are violet (unless I have become color-blind :-)

Interface implementation is shown via the lollipop shape, and it's good to see just one of these coming out of a class with a list of all the interface names below it: this reduces clatter. Should you wish to view the member of each interface separately, this is just a context menu away: "Show Interface". Inheritance is represented by the UML closed arrow head. The only other relationship supported is open arrow head association (i.e. when a type references another type) and there is an excellent feature where a field/property can be visualised as an association or vice versa: "Show as Association". Naturally, if one of your classes contains a field of a framework type, then showing as association will show a class of the framework type...this is great for reverse engineering the .NET library classes.

The Class Designer is always in synch with your code. In case that was not clear, any change in the class diagram (e.g. adding a method, changing a field) is reflected in code and any change in the code (e.g. deleting a property, changing a delegate) is reflected on the diagram; there is no code generation/reverse engineering step; they are just "naturally" in synch. In fact, if you look at the file (with extension "cd") you will find an XML document with layout and file information, but nothing that describes the members of the types as they are all read via reflection every time the class diagram is displayed. Navigation between the two is easy: going from a diagram element to its code counterpart is a double-click away and at any point in a code file, one can "View in Diagram" the types declared in the file.

Did I mention that Class Designer not only is available for all languages but also for CF projects as well :-D

Next time we'll look at what is still missing...