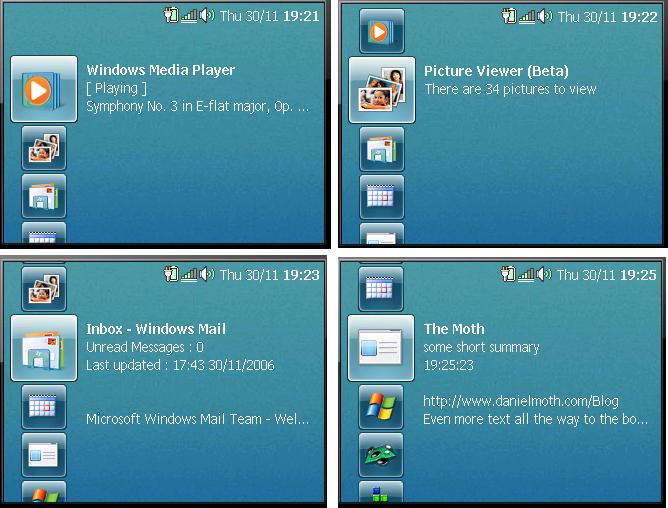
Please read the intro to SideShow and the SideShow gadget fundamentals posts as they provide essential background to this post.Glance dataYour gadget may send to the SideShow device a complex UI and various navigation structures between pages of your UI. Regardless of whether it does that, it must first send what we call
glance data. This is just plain text, and it is the text that appears next to your gadget icon when the user browses the gadgets on the device. Examples of glance data for the Windows Media Player, Picture Viewer, Windows Mail and our gadget, you can see in the following screenshot:
 Simple Content Format (SCF)
Simple Content Format (SCF) is a simple XML format. It is used to describe pages and the elements on a page (except of course the very first glance data page which we established is plain text) including how everything maps to the buttons on the device. For an overview of SCF,
click here.
When we look at the API later, we'll see that we send XML fragments to the device and each XML fragment represents a page.
PagesA page is what is displayed on the SideShow device. For Windows Forms developers, think of this as the equivalent to a Form, except there is no designer and the way we describe what the page contains is via the SCF (which as I said is just XML, in this case an XML element that can contain other XML elements). All pages have a unique content id. Page types can be: content, menu, dialog.
For more, see SDK for
body,
content,
menu and
dialog.
Page ItemsElements on a page are the things that end users see on a page on the display (and the things that sometimes the hardware button actions apply to). For Windows Forms developers, think of this as the equivalent to WinForms Controls, except we don't drag and drop them on the page and the way we add them is via the SCF (they are just XML elements). Each element must have a unique content id. There can only be one element per (imaginary) row on the display, a bit like the guidelines for
Smartphone development. These elements can be: menu item, button, image, text and blank lines.
For more, see SDK for
item (including
div),
btn,
img,
txt (including
clr and
em),
br.
ButtonsSCF-compatible SideShow devices must have at least 5 physical buttons: UP, DOWN, ENTER, BACK and MENU.
- UP and DOWN have a fixed function of navigating up and down a menu page (or a context menu) and scrolling up and down a page that shows a vertical scrollbar.
- MENU shows a fixed built-in context menu [Back, Home] but you can also add your own menu items above the 2 built-in ones.
- BACK returns to the previous page. The BACK button can also be overridden if you desire to do something specific to your page.
- ENTER (aka SELECT aka OK) takes whatever action you have assigned to a menu item. The ENTER button can also be overridden if you desire to do something specific to your page. Also, the ENTER button is what navigates from the glance data page to your first real (SCF) page.
The other two buttons that may be present on an SCF device are LEFT and RIGHT. If they are present, you can also assign to them custom actions relevant to your page (but also provide those on the context menu of the page in case they are missing).
Just FYI, for non-SCF devices you can also have buttons for PLAY, PAUSE, STOP, REW, FF.
ImagesNote that in addition to the glance data and in addition to XML representing each page, we can also send images (with their own content id of course) that can be referenced from pages and elements.
Mapping SCF to screenshotsIf you followed the links to the SDK that I provided previously, you can read all about what SCF element combinations are allowed, what attributes each element accepts for configuring its appearance/behaviour etc. Let's see how easy the SCF is by mapping the XML to the screens they result in.
1. In the screenshot below you can see a menu page with 6 menu items and a divider line after the 3rd menu item. The content id of this page is 1.
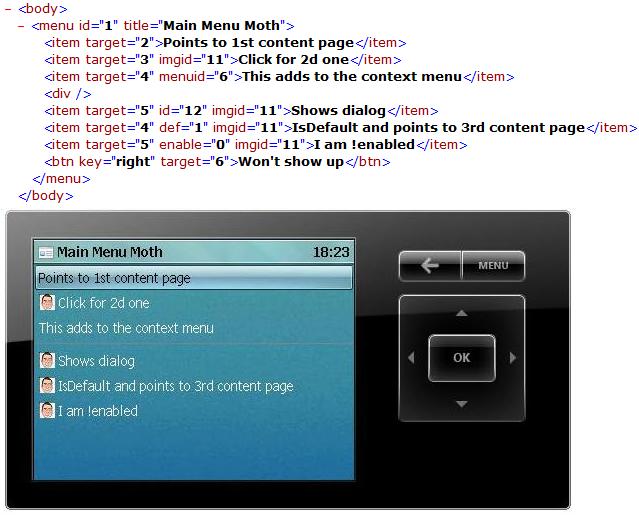
Notice how the XML elements map to the screen elements?
- Most menu items have their
imgid set to a content id that represents an image that we have also sent to the device (along with the XML) - the 1st and 3rd menu items do not have this attribute and hence there is no icon next to the text for them.
- Looking at the XML you can tell that the 5th menu item is the default one that would be preselected when this page was loaded.
- The last menu item is disabled (its appearance doesn't show that, but if you hit ENTER after selecting it, nothing happens!).
- The 3rd menu item has an attribute that the others don't:
menuid. This means that if we press the MENU button after selecting this menu item, the context menu will include menu items that we specified on another page with a content id of 6. If we press the MENU button on any other menu item, just the default built-in context menu will appear.
- Pressing the UP and DOWN buttons navigates up and down the menu structure.
- Pressing the ENTER button will navigate to the page that has a content id equal to the
target of the menu item (see the XML in the screenshot).
- Finally, notice how there is a
btn element in the XML. This does not show on the content page, but if we hit the RIGHT button it will navigate to whatever has a content id of 6 e.g. another page.
2. In the screenshot below you can see a content page with 3 text elements and an image element after the 2nd text element. The content id of this page is 2 (so this will appear when on the previous menu page we select the 1st menu item and we hit ENTER).
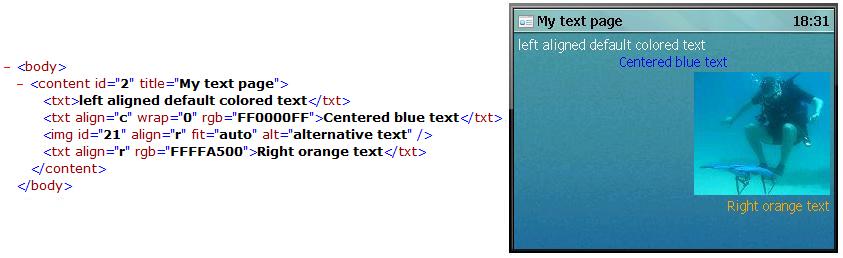
Notice in the XML how the text attributes
align and
rgb control the alignment and colour of the text. Notice how the image element references an image with id 21 that we must have also sent down to the device.
3. In the screenshot below you can see another content page with just one text element. The content id of this page is 3.
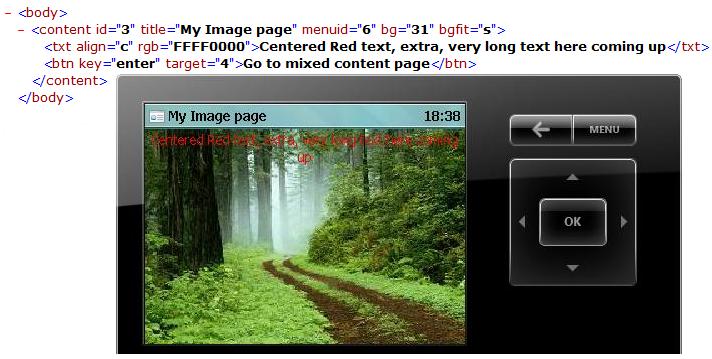
- This shows wrapping in action for the text element (
wrap="1"). If that was not set then the text would have been chopped off. In the XML we also see a button element.
- This is not shown on the screen but if we hit the ENTER button then we would navigate away from this page and on to the page with a content id of 4. If this button element was not in the XML, then hitting the ENTER button would not do anything.
- Observe how the content element also specified the
bg attribute pointing to content id 31. Clearly content id 31 must be another image that we sent to the device and it is now set as a background to this page.
- Also notice the
menuid attribute of this content page: 6. So we must have defined a menu page with a content id of 6 that will be merged with the default context menu when we press the MENU button.
4. In the screenshot below you can see the final content page of this gadget, with two text elements separated by two blank lines. The content id of this page is 4.
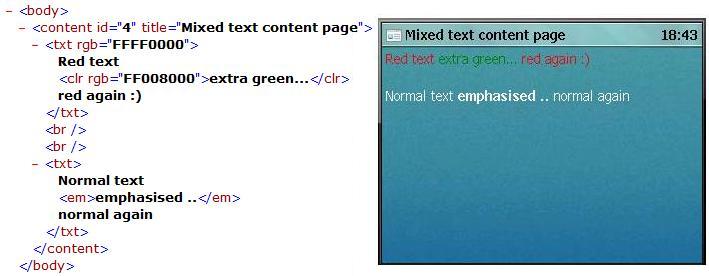
This page demonstrates that text elements can have two other nested elements that allow the same line of text to have mixed colouring and emphasis.
5. In the screenshot below you can see our first (and only) dialog page with two text elements and 3 buttons. The content id of this page is 5.
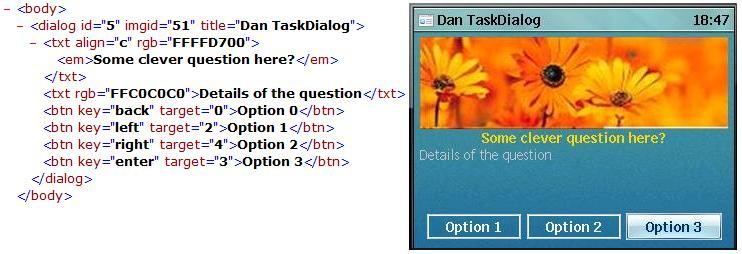
What we see here is that for dialog pages, the buttons can appear on the screen (except if the button element is assigned to the BACK button). Also, the dialog element has an attribute for an image that it will insert before any other element (something like a banner).
6. In the screenshot below you see a menu page with a single menu item. The content id of this page is 6.
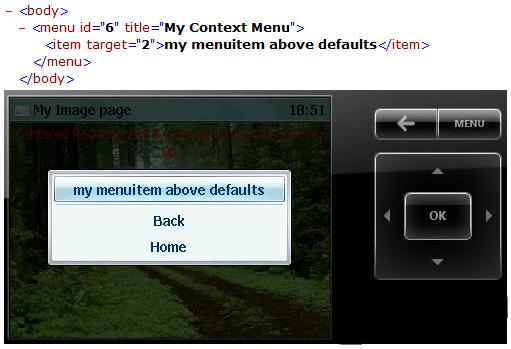
Do you recall above, that content page with id of 3 had specified as its
menuid the content id 6? If you press the MENU button on that page, it is the screenshot above that will appear. Our menu item is merged with the default context menu. Note that if you hit the RIGHT button on the first menu page we described, then a full screen menu page will appear with just the single menu item we define here.
Tool supportI encourage you to study the built-in gadgets with the knowledge you gained above and mentally map the elements you see on the screen to the SCF elements.
Note that the two games in the simulator are not gadgets (hence they don’t appear in the control panel), instead they are built-in NETMF applications.There is no tool for designing the UI of the content that your gadget will send down to the device. This is a great opportunity for some smart individual to create one! How hard would it be to have a GUI designer tool that spits out valid SCF? ;-)
Regardless of how the SCF gets created, each page (i.e. each complete
body element) has to be sent down to the device. Once sent, you can update it from your gadget periodically or when your data on the PC has changed. As an example, the Media Player gadget sends every 1 second a page with the same content id to the device. The only thing that changes on that page is the progress duration of the song. So how do we send SCF to a SideShow-compatible display?
Native APIThere is a
native COM API for those still living in that world :-)
If you do want to mess with the
ISideShowSession,
ISideShowContentManager,
ISideShowContent and their friends then here is my top tip: There are 4 different sample SideShow gadgets in the
SDK. They all use the COM API so you can explore them. In fact, the Picture Viewer gadget I linked to earlier is pretty much the same as the one in the SDK.
Managed APIThat will be shown next time - honest!