Sun, September 21, 2008, 10:11 PM under
dotNET
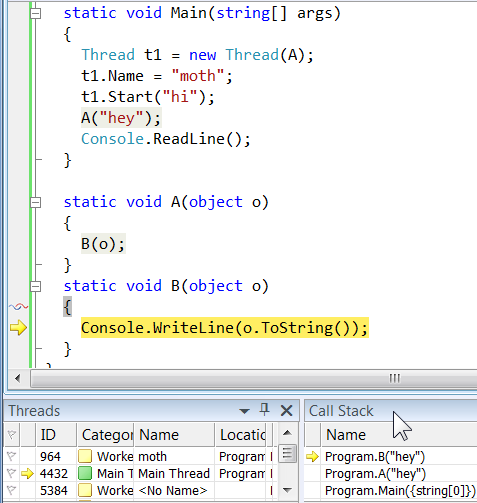
Each thread has a call stack (a list of
stack frames, each representing a method call and the relevant state). When you break in the debugger, you can see it in the Call Stack window for the current thread, e.g. bottom right of this screenshot:
The
current thread (aka active thread in some circles) is the thread that is currently selected in the Threads window, indicated by the yellow arrow icon (in the screenshot above, the "Main Thread"). By default the current thread is the one that hit the breakpoint (or, for example, the one on which the exception was thrown) which resulted in breaking in the debugger (all threads). You can switch the current thread via the ContextMenu on the Threads window (or by double clicking on a thread in the listview). When changing the current thread, the Call Stack window updates itself.
The Call Stack window indicates the top of stack (the latest stack frame) of the current thread with a yellow arrow icon (in the screenshot above, the “Program.B("hey")”). This is known as the
active stack frame. When switching threads, obviously the active stack frame changes. When execution resumes (e.g. via F5), the execution continues from the active stack frame onwards (to be more specific, from the active stack frames of any/all of the threads). The active stack frame, by default, is also the current stack frame for that thread.
The
current stack frame is the stack frame that drives the rest of the debugger toolwindows e.g. Locals, Autos, Watch and even the code editor. You can change the current stack frame by using the ContextMenu on the call stack window (or double clicking there). When changing the current stack frame to be something other than the active stack frame, it shows a green arrow. For example, in the following screenshot we double clicked in the Call Stack window on “Program.A("hey")”:
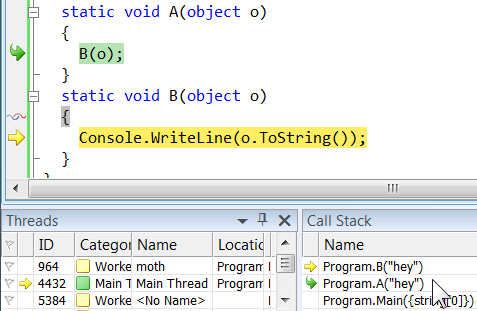
Obviously, if you change the current stack frame, when execution resumes it will still resume from the active stack frame(s). So, setting the current stack frame is purely a temporary action for inspecting the relevant data to that frame, e.g. in the Locals window.
On the screenshot above, notice the 3 icons shown in the margin of the code editor:
1. Yellow arrow: for the active stack frame of the current thread (in our example, of “Main Thread”).
2. Green arrow icon: if we have set the current stack frame to be something other than the top of stack (in our example, “Program.A”).
3. Red and blue cloth threads icon: the active stack frames of all other non-current threads (in our example, “moth”).
Quick Check: If you double click on the “moth” thread in the Threads window, what would the screenshot above look like in terms of icons in the code editor, threads window and call stack window? Picture it first and then check your answer by
viewing this screenshot. Did you get it right?
Developers that have not used VS2008 in multithreaded programs, tend to forget the usefulness of the red and blue cloth threads icon. If you are one of those devs,
watch my video for a refresher.
Let me ask another easy question: Why don’t we see this new icon anywhere else in the debugger toolwindows? The obvious answer to the question is that: no toolwindow shows active stack frames of non-current threads; hence the cloth threads icon does not appear anywhere.
The real issue here is that we only have a single Call Stack window that can only show stackframes for the current thread. Given that all threads are equal and “current” in real terms, Visual Studio’s notion of “current thread” as the only one we can focus on is limiting (to our productivity at least). In a following post I’ll explore an (imaginary?) solution ;-)