We want to speak at your company!

Tue, December 12, 2006, 02:31 AM under Events
Us:
We are the Microsoft developer and platform team in the UK.

You:
You are a company in the UK with a room that can hold 35+ people; your developer people!

The "contract":
You provide the room and people, we provide the entertainment. Well, I say entertainment, but what I mean is free presentations on developer aspects of Vista and Office. We’ll also throw some prizes on the day :-) Also, if you don’t mind, we’ll publicise your involvement and contribution!

What to do next:
Volunteer via email: mailto:msukdpetech@hotmail.co.uk

More details:
http://ukvistaofficelaunchtour.spaces.live.com/

Managed code and the Shell – Don’t!

Mon, December 11, 2006, 03:59 PM under dotNET
A few months ago when I was looking at what new Vista native APIs to play with from managed code, I was advised internally not to touch anything that is loaded in arbitrary processes. The short answer was that this has versioning implications.

Let's drill into it. If you write a shell extension of any sort with managed code, you have introduced a dependency onto the version of the CLR that you are using. The classic example is to think of all the managed applications on a computer that open a file dialog. Every time they do that, your .NET shell extension code gets injected into their process and bad things can happen (not just to the shell) but more importantly to those applications *IF* the version used in your managed extension, is not the same as the version used by that application. So the real root of this issue is the fact that each process can only load one version of the CLR combined with the fact that a version of the CLR can side by side on the same machine with other versions of the CLRs.

It sounds like we are pretty serious about this advice. An article written in 2004 demonstrating how to write namespace extensions with managed code was edited this June 2006 to include the following warning in red at the top of the article:
[ Editor's Update - 6/23/2006: Because shell extensions are loaded into arbitrary processes and because managed code built against one version of the runtime may not run in a process running an earlier version of the runtime, Microsoft recommends against writing managed shell extensions and does not consider them a supported scenario.]

Now at this point, some of you will have arguments and workarounds of how to avoid this limitation. I doubt they haven’t been raised already, but if you think you have something new to offer, go contribute to this extremely interesting discussion on the msdn forums (inc. contributions from Raymond Chen).

Vista and Office Launch event

Thu, December 7, 2006, 08:24 PM under Events
For my international readers outside the UK, you can take part in the UK Developer launch of Windows Vista and the 2007 Office System by following online the sessions on the two concurrent tracks:
- Vista Agenda
- Office Agenda

For UK residents I only have two words: REGISTER NOW!

Gadget in C#

Tue, December 5, 2006, 02:53 PM under Windows | Vista | SideShow
Goal
Walk through all the code required to write the SideShow gadget that we designed and showed screenshots of here.

Prerequisites
1. SideShow
2. Gadget Fundamentals
3. Designing with SCF
4. Microsoft.SideShow.dll

Installation/registration revisited
When talking about the basics of SideShow gadgets you saw how we need to create the appropriate registry keys and run a command for the Gadget manager to notify the user. You can actually achieve all of those actions in managed code and specifically with one line of code (I’ve separated the parameters into their own variable to make the line of code self-explanatory):
bool registerForAllUsers = false;
Guid gadgetId = new Guid("{65EA3E9A-8F83-4139-8139-94DE7E4149B0}");
string startCmd = String.Empty;
string iconPathNameAndResourceId;
bool onlineOnly = false;
Guid? propertyPage = null;

GadgetRegistration.Register(registerForAllUsers,
gadgetId, ScfSideShowGadget.ScfEndpointId, "The Moth", startCmd,
iconPathNameAndResourceId, onlineOnly, GadgetCachePolicies.KeepOldest, propertyPage);
To uninstall/unregister the gadget we need another line of code
GadgetRegistration.Unregister(registerForAllUsers, gadgetId);

ScfSideShowGadget class
Writing a gadget in managed code begins by creating a ScfSideShowGadget object (that you must remember to Dispose when your gadget exits). The way the gadget is associated with the registration/installation metadata is via the use of the same gadget GUID, of course. The following code snippet demonstrates that:
  ScfSideShowGadget gadget = new ScfSideShowGadget(new Guid("{65EA3E9A-8F83-4139-8139-94DE7E4149B0}"));
// send content to device
Sending glance data
Sending glance data is simply one line of code:
gadget.AddGlanceContent("some short summary \r\n" + DateTime.Now.ToLongTimeString() + "\r\n http://www.danielmoth.com/Blog \r\n Even more text all the way to the \r\n bottom");

Sending Images
Any images rendered on the SideShow-compatible device must be sent there of course and their content ids can then be referenced from the SCF XML snippets. The following code shows sending of the images:
string path = @"C:\Users\Public\Pictures\SideShow\";
string b = path + "SSForest.jpg";
string d = path + "SSgarden.jpg";
string m = path + "SSmenu.jpg";
string r = path + "SSdive.jpg";
gadget.AddContent(MothImages.Background, ImageContentTransforms.None, new Bitmap(b));
gadget.AddContent(MothImages.DialogIcon, ImageContentTransforms.KeepAspectRatio ImageContentTransforms.StretchToFit, new Bitmap(d));
gadget.AddContent(MothImages.MenuIcon, ImageContentTransforms.ReduceColorDepth, new Bitmap(m));
gadget.AddContent(MothImages.RandomImage, ImageContentTransforms.None, new Bitmap(r));
In the code above, MothImages is a simple class for holding the integer image content ids (as opposed to hard coding them in the body of the code).

Sending SCF content
As you’ll recall from the introduction to SCF, each page is its own SCF body tag. When sending pages to the device, we make a single method call per page that we want to send: a different overload of the AddContent method we already saw above for sending images. The code that follows is what was used to create *all* the screenshots of my previous SideShow blog post:
gadget.AddContent(MainMenuPage); //MainMenuPage is a property that returns a string
gadget.AddContent(ContextMenuPage); // ContextMenuPage is a property that returns a string
gadget.AddContent(ContentPageA); // ContentPageA is a property that returns a string
gadget.AddContent(ContentPageB); // ContentPageB is a property that returns a string
gadget.AddContent(ContentPageC); // ContentPageC is a property that returns a string
gadget.AddContent(DialogPage); // DialogPage is a property that returns a string
The above piece of code assumes that the properties we pass into the AddContent method calls return the XML as we designed it last time. This could look something like this:
public static string MainMenuPage
{
get
{
string content;
content = File.ReadAllText("page1.xml");
return content;
}
}
In the code above, page1.xml would hold the XML of this SideShow screenshot.

SCF creation revisited
So the above few lines of C# code register our gadget, create it and send both glance data and content data! The only thing it assumes is that we have created the SCF XML in a file already (i.e. in page1.xml).

However, Microsoft.SideShow.dll offers a class (Scf) with static methods (Body, Br, Btn, Clr, Content, Dialog, Div, Em, Img, Item, Menu, Txt) each with appropriate overloads that accept as parameters the attributes you would set on an SCF XML element and returns the equivalent XML. So, if you don’t want to hand craft the XML, you can get some intellisense help doing so programmatically (still no graphical way though).
For example, recall the screenshot of this XML and page? Here is the code that can generate that:
    content =
Scf.Body(
Scf.Menu(MothPages.MainMenu, "Main Menu Moth", ScfSelectAction.Target,
Scf.Item(MothPages.SomeText, "Points to 1st content page"), // 1st overload
Scf.Item(MothImages.MenuIcon, null, MothPages.WithImage, "Click for 2d one"), //2nd overload
Scf.Item(null, MothPages.ContextMenu, MothPages.MixedText, "This adds to the context menu"), // 2nd overload with context menu
Scf.Div(),
Scf.Item(MothMenuIds.Open, MothImages.MenuIcon, null, MothPages.DialogExample, "Shows dialog"), //3rd overload
Scf.Item(null, MothImages.MenuIcon, true, true, null, MothPages.MixedText, "IsDefault and points to 3rd content page"), // 4th overload
Scf.Item(null, MothImages.MenuIcon, false, false, null, MothPages.DialogExample, "I am !enabled"), // 4th overload, default & enabled
Scf.Btn(DeviceButton.Right, "Won't show up", MothPages.ContextMenu)
)
);
In the code above, any class starting with Moth is a simple class for holding the integer content ids. As a further example, the following screenshot shows some SCF XML and the c# code required to generate it (for the two pages that look like this and like that):

What’s left
Tons of stuff :-D
There are many more developer capabilities that we haven’t talked about on the SideShow platform and, instead of introducing them generically, I’ll introduce them as part of the managed API over subsequent posts... or maybe I should wait until we make Microsoft.SideShow.dll publicly available before doing so... let me know if you’d like to learn about it beforehand regardless...

Expression and WPF/e

Mon, December 4, 2006, 12:48 PM under Links
The exciting stuff I hinted at here are now... live!

Mike has all the useful links and accurate IMO commentary. BTW, you can catch both of us at the FOTB event tomorrow in Brighton.

Other link blogging about Expression or WPF/e: UX journey, WPF/e DevCenter, Wow indeed.

In case any of you are not getting with the programme in this new “UX matters” world, go visit the Microsoft Design Centre.

Designing SideShow gadgets with SCF

Thu, November 30, 2006, 02:35 PM under Windows | Vista | SideShow
Please read the intro to SideShow and the SideShow gadget fundamentals posts as they provide essential background to this post.

Glance data
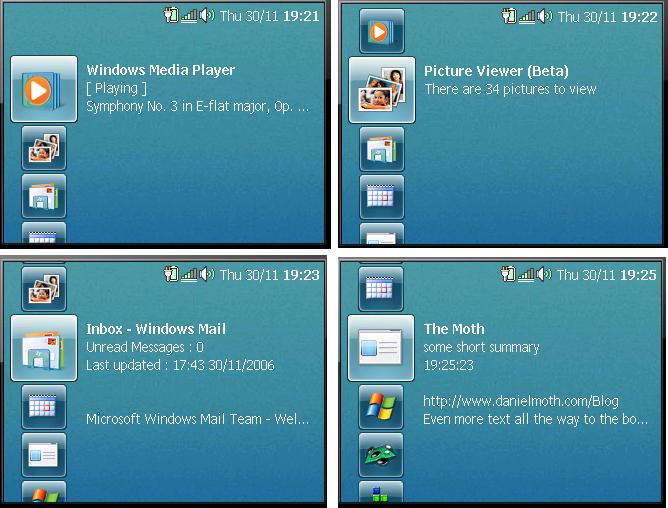
Your gadget may send to the SideShow device a complex UI and various navigation structures between pages of your UI. Regardless of whether it does that, it must first send what we call glance data. This is just plain text, and it is the text that appears next to your gadget icon when the user browses the gadgets on the device. Examples of glance data for the Windows Media Player, Picture Viewer, Windows Mail and our gadget, you can see in the following screenshot:

Simple Content Format (SCF)
Simple Content Format (SCF) is a simple XML format. It is used to describe pages and the elements on a page (except of course the very first glance data page which we established is plain text) including how everything maps to the buttons on the device. For an overview of SCF, click here.

When we look at the API later, we'll see that we send XML fragments to the device and each XML fragment represents a page.

Pages
A page is what is displayed on the SideShow device. For Windows Forms developers, think of this as the equivalent to a Form, except there is no designer and the way we describe what the page contains is via the SCF (which as I said is just XML, in this case an XML element that can contain other XML elements). All pages have a unique content id. Page types can be: content, menu, dialog.

For more, see SDK for body, content, menu and dialog.

Page Items
Elements on a page are the things that end users see on a page on the display (and the things that sometimes the hardware button actions apply to). For Windows Forms developers, think of this as the equivalent to WinForms Controls, except we don't drag and drop them on the page and the way we add them is via the SCF (they are just XML elements). Each element must have a unique content id. There can only be one element per (imaginary) row on the display, a bit like the guidelines for Smartphone development. These elements can be: menu item, button, image, text and blank lines.

For more, see SDK for item (including div), btn, img, txt (including clr and em), br.

Buttons
SCF-compatible SideShow devices must have at least 5 physical buttons: UP, DOWN, ENTER, BACK and MENU.
- UP and DOWN have a fixed function of navigating up and down a menu page (or a context menu) and scrolling up and down a page that shows a vertical scrollbar.
- MENU shows a fixed built-in context menu [Back, Home] but you can also add your own menu items above the 2 built-in ones.
- BACK returns to the previous page. The BACK button can also be overridden if you desire to do something specific to your page.
- ENTER (aka SELECT aka OK) takes whatever action you have assigned to a menu item. The ENTER button can also be overridden if you desire to do something specific to your page. Also, the ENTER button is what navigates from the glance data page to your first real (SCF) page.

The other two buttons that may be present on an SCF device are LEFT and RIGHT. If they are present, you can also assign to them custom actions relevant to your page (but also provide those on the context menu of the page in case they are missing).

Just FYI, for non-SCF devices you can also have buttons for PLAY, PAUSE, STOP, REW, FF.

Images
Note that in addition to the glance data and in addition to XML representing each page, we can also send images (with their own content id of course) that can be referenced from pages and elements.

Mapping SCF to screenshots
If you followed the links to the SDK that I provided previously, you can read all about what SCF element combinations are allowed, what attributes each element accepts for configuring its appearance/behaviour etc. Let's see how easy the SCF is by mapping the XML to the screens they result in.

1. In the screenshot below you can see a menu page with 6 menu items and a divider line after the 3rd menu item. The content id of this page is 1.
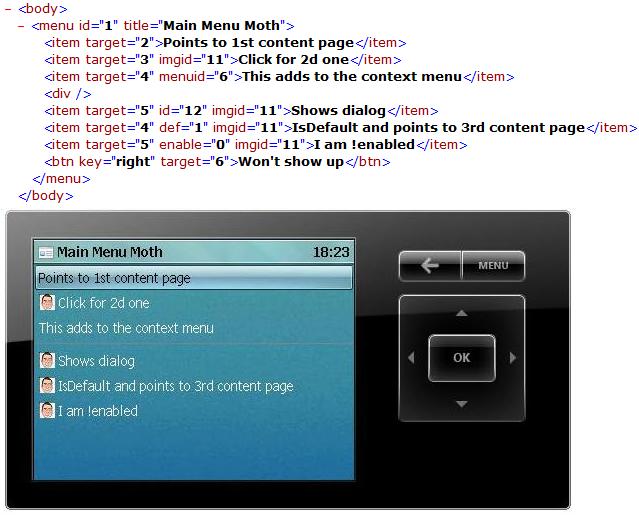
Notice how the XML elements map to the screen elements?
- Most menu items have their imgid set to a content id that represents an image that we have also sent to the device (along with the XML) - the 1st and 3rd menu items do not have this attribute and hence there is no icon next to the text for them.
- Looking at the XML you can tell that the 5th menu item is the default one that would be preselected when this page was loaded.
- The last menu item is disabled (its appearance doesn't show that, but if you hit ENTER after selecting it, nothing happens!).
- The 3rd menu item has an attribute that the others don't: menuid. This means that if we press the MENU button after selecting this menu item, the context menu will include menu items that we specified on another page with a content id of 6. If we press the MENU button on any other menu item, just the default built-in context menu will appear.
- Pressing the UP and DOWN buttons navigates up and down the menu structure.
- Pressing the ENTER button will navigate to the page that has a content id equal to the target of the menu item (see the XML in the screenshot).
- Finally, notice how there is a btn element in the XML. This does not show on the content page, but if we hit the RIGHT button it will navigate to whatever has a content id of 6 e.g. another page.

2. In the screenshot below you can see a content page with 3 text elements and an image element after the 2nd text element. The content id of this page is 2 (so this will appear when on the previous menu page we select the 1st menu item and we hit ENTER).

Notice in the XML how the text attributes align and rgb control the alignment and colour of the text. Notice how the image element references an image with id 21 that we must have also sent down to the device.

3. In the screenshot below you can see another content page with just one text element. The content id of this page is 3.
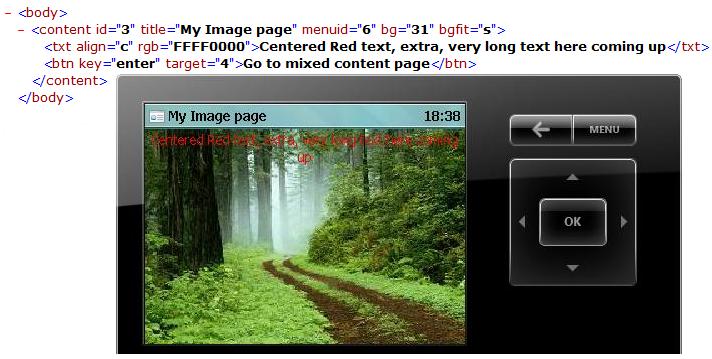
- This shows wrapping in action for the text element (wrap="1"). If that was not set then the text would have been chopped off. In the XML we also see a button element.
- This is not shown on the screen but if we hit the ENTER button then we would navigate away from this page and on to the page with a content id of 4. If this button element was not in the XML, then hitting the ENTER button would not do anything.
- Observe how the content element also specified the bg attribute pointing to content id 31. Clearly content id 31 must be another image that we sent to the device and it is now set as a background to this page.
- Also notice the menuid attribute of this content page: 6. So we must have defined a menu page with a content id of 6 that will be merged with the default context menu when we press the MENU button.

4. In the screenshot below you can see the final content page of this gadget, with two text elements separated by two blank lines. The content id of this page is 4.
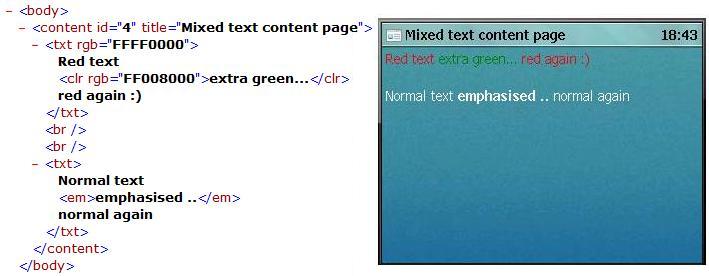
This page demonstrates that text elements can have two other nested elements that allow the same line of text to have mixed colouring and emphasis.

5. In the screenshot below you can see our first (and only) dialog page with two text elements and 3 buttons. The content id of this page is 5.
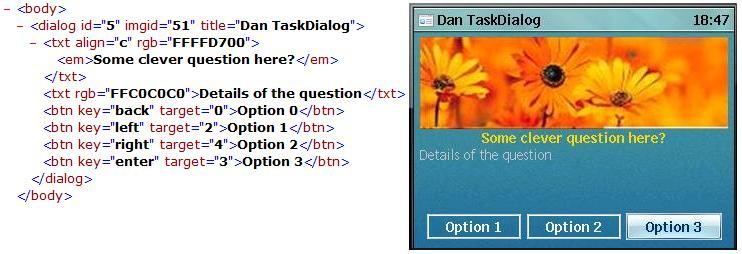
What we see here is that for dialog pages, the buttons can appear on the screen (except if the button element is assigned to the BACK button). Also, the dialog element has an attribute for an image that it will insert before any other element (something like a banner).

6. In the screenshot below you see a menu page with a single menu item. The content id of this page is 6.
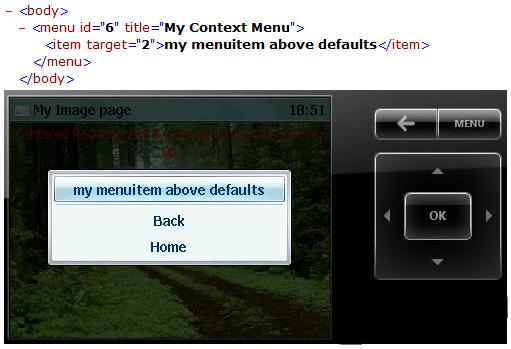
Do you recall above, that content page with id of 3 had specified as its menuid the content id 6? If you press the MENU button on that page, it is the screenshot above that will appear. Our menu item is merged with the default context menu. Note that if you hit the RIGHT button on the first menu page we described, then a full screen menu page will appear with just the single menu item we define here.

Tool support
I encourage you to study the built-in gadgets with the knowledge you gained above and mentally map the elements you see on the screen to the SCF elements. Note that the two games in the simulator are not gadgets (hence they don’t appear in the control panel), instead they are built-in NETMF applications.

There is no tool for designing the UI of the content that your gadget will send down to the device. This is a great opportunity for some smart individual to create one! How hard would it be to have a GUI designer tool that spits out valid SCF? ;-)

Regardless of how the SCF gets created, each page (i.e. each complete body element) has to be sent down to the device. Once sent, you can update it from your gadget periodically or when your data on the PC has changed. As an example, the Media Player gadget sends every 1 second a page with the same content id to the device. The only thing that changes on that page is the progress duration of the song. So how do we send SCF to a SideShow-compatible display?

Native API
There is a native COM API for those still living in that world :-)

If you do want to mess with the ISideShowSession, ISideShowContentManager, ISideShowContent and their friends then here is my top tip: There are 4 different sample SideShow gadgets in the SDK. They all use the COM API so you can explore them. In fact, the Picture Viewer gadget I linked to earlier is pretty much the same as the one in the SDK.

Managed API
That will be shown next time - honest!

SideShow gadget fundamentals

Wed, November 29, 2006, 08:14 AM under Windows | Vista | SideShow
In a previous post I described the new Windows Vista feature: SideShow. Please read that as I will assume that you have done so since it helps if you perceive the terminology and concepts in the same way that I do :-)

Gadget and SideShow device interaction
Remember that gadgets are just applications running on your laptop/PC that send data to a SideShow-compatible device. The gadget does not run on your actual auxiliary display. If you ever read "browse different gadgets on your SideShow display" you can interpret that as "browse the contents that the various gadgets from your laptop send to your SideShow display".

At a high level think of the gadget communications being one of the following (I cover these later):
- Gadget sends a message with content to the device.
- Device may optionally send event back to the gadget (e.g. at a click of a hardware button).
- Gadget may optionally send a notification to the device.

SideShow target
Before you write a SideShow gadget it helps if you have a target to test it on. If you have a real device great, otherwise your best friend is the SideShow simulator, which comes with the Windows SDK. Different SideShow devices will have different capabilities. At the most basic think about a 2-line monochrome text display with no hardware buttons. For this device you can only update it with text. At the other end of the spectrum, devices may understand the iCalendar format so you can send calendar data to it (e.g. the simulator and any full NETMF implementation) and it will interpret it in a rich manner. You can even plug custom content formats for your own SideShow-compatible device. Having said that, most devices will understand the Simple Content Format (SCF) , a device-independent XML format which is core to SideShow (I cover this later). There are APIs for querying at runtime the capabilities of the SideShow target(s) that the user has connected. In everything I write/do, I am going to assume that the target supports the SCF (e.g. the simulator does).

Gadget installation
Usually installation is left as the last thing you learn in any application development, but in this case it is important to understand this first as you will have to install the gadget even on your own dev machine before you do anything (and by "anything" I mean run it, debug it etc).

Gadget installation is simply a collection of registry entries in the right place (think of these as 'gadget metadata'). For example, for the built-in gadgets you can browse their registry entries by navigating to HKEY_LOCAL_MACHINE\SOFTWARE\Microsoft\SideShow\Gadgets. Under there you will find keys that are basically GUIDs. Every gadget has its own application GUID that the developer must generate (I buy mine from uuidgen or guidgen). Under each GUID, there are various values that describe the gadget. The following screenshot shows the registry entries for one of the Outlook 2007 gadgets:

This one shows the Picture Viewer gadget (available from the online gallery):

I also have registry screenshots of the 2 built-in gadgets if you are away from your Vista box right now: Windows Media Player and Windows Mail.

When you deploy your gadget to other computers, you'll have a setup program of some sort to do this for you but for now let's add the registry entries for our gadget manually. Of course, we will install it for the current user only, here: HKEY_CURRENT_USER\Software\Microsoft\SideShow\Gadgets (i.e. same path as above but instead of HKLM we go to HKCU).

First create a key under the Gadgets key with your own guid for your gadget (TIP: at the end of all this, if you want to remove the gadget simply delete this key!).

Under that key, we need to specify the following:
1. Endpoints that we support. I will only support the SCF endpoint: {A9A5353F-2D4B-47ce-93EE-759F3A7DDA4F}
2. FriendlyName. Mine will be "The Moth"
3. OnlineOnly (i.e. content is not cached on device, and computer must be on). Mine will be only online: 1
4. Icon. Nothing for me, so it will get the default.
This is what your registry should look like after doing the above:

If you were doing all of the above in an installation program, you should also run at the command line the following to invoke the Gadget Manager for a better user experience:
Schtasks.exe /run /tn Microsoft\Windows\SideShow\GadgetManager

Try it manually! You’ll see the following screenshot:

If you click on that notification (which is what your users would have seen) it will take you straight to the SideShow control panel. To be honest, you can go straight to control panel after you made the registry modifications and refresh. Your control panel should now look something like the following screenshot:

(my additional device column is irrelevant for now, I’ll talk about that later).

Hopefully you are running your simulator. Check the box next to the gadget under your simulator and notice how the gadget is available to use. See following screenshot of what it should look like on the simulator:


What is left?
So now all we need is a windows process for our gadget. That is easily found: Either create a brand new GUI exe or a console EXE or a blind exe or use an existing exe.

Once we have an EXE, then all we need is to write some code in there that calls the relevant APIs to send content down to the device. Before we do that though let’s think what that content should depict. In other words, what should the UI of our application look like?

NOTE: Where it now says "(No information availalbe)", we should have our first text content. When the user clicks on OK, we should show a full page of more content etc.

This blog post is getting long already so in my next SideShow blog entry we'll design in SCF a few pages with elements, and also see how to send that down to the device using the SideShow API.

UK events: Vista, DDD, FOTB

Wed, November 29, 2006, 12:28 AM under Events
* This Saturday in Reading I'll be supporting DDD4 (so come talk to me at the ATE area). At lunch time there are some activities that you cannot afford to miss out on. Check it out!

* Next Monday 4th and Tuesday 5th, I'll be hanging in the Flash On The Beach (FOTB) conference, here in Brighton (wonder how many of the Brighton bloggers will be there). In case you are wondering what a softie is doing at such an event, just wait and see... exciting stuff coming your way ;-)

* Next Wednesday 6th I am re-running in London my Vista for developers session- native APIs callable from C#. Register here.

Windows SDK

Tue, November 28, 2006, 11:49 PM under Windows | Vista
I say this at every given opportunity (on the blog, in my talks etc) but it is so important I thought I'd dedicate a permalink to it.

If you are a developer and have installed Vista, the first thing you should download is the Windows SDK. It is in there that you can find goodies such as Vista Bridge or the SideShow simulator. There is also plethora of native samples for the 7000 new native APIs in Windows Vista. In addition, you'll find tons of managed samples for .NET v2.0 and .NET Framework v3.0. This makes sense since the Windows SDK is the unification of what was known as the platform SDK and the dotnet SDK. Download it now!

the required ActiveSync proxy ports are not registered

Tue, November 28, 2006, 09:42 AM under MobileAndEmbedded
In the presentation to students that I mentioned here, I thought it was essential to show the smart device project deploy to the actual device (rather than the emulator that I use almost exclusively nowadays) since for newbies to the dev experience, I think it adds a lot of value to see that "this stuff is real".

When prepping for the event I realised that deploying to the device (and not the emulator) was broken on Vista! The error shown in the Error List was:
the required ActiveSync proxy ports are not registered
...this came from the Device Connectivity Component

I had heard the rumour that there are issues with VS2005 development on Vista but other than the one I talked about here, I had never faced *any* issues so this was a first for me! Luckily someone from the VSD team was able to give me a virtual slap and remind me that I should dogfood the workarounds we give to the public: Run VS2005 elevated – doh! I have never had to do that to date... Luckily I received this advice before my presentation earlier today :-)

Blogging this in case anyone else faces this issue (surprisingly no search results for the error above). If you are running WMDC on Vista RTM with VS2005 (without SP1) and you get the error above, run VS elevated (right click and select “Run as administrator”) and the issue goes away... phew!

For other device development issues on Vista see the relevant VSD blog entry.