Sun, October 18, 2009, 08:47 PM under
ParallelComputing |
HPC
Recently I decided to play around with developing for a cluster on the Microsoft platform and below are the steps I had to take with regards to installation.
First I gathered a number of old machines at the office, in my case that is 3 dual-core boxes, but you could have done it with just 2 PCs (or many more of course).
On each one of those you must install:
Windows HPC Server 2008 (link to trial)
a. This includes a trial of the Windows Server 2008 RTM 64-bit operating system (SRVHPC_EN.iso). I already had Windows Server on a separate disc, so I installed what I had. I did not try R2, which is the same code base as Win7, but that should work too. Note that this is just the vanilla operating system (even Standard Edition is good enough) and the important part is the 64-bit. I will assume that you are all capable of installing an OS, so no more instruction or special consideration needed here (window update, join domain, add users etc).
b. The second part of the link above is an add-on to the operating system, namely the HPC Pack 2008 (HPCEval.iso). It is a wizard with a set of steps to complete which are all fairly explanatory of the "click Next" flavor. After installation of the HPC Pack, the HPC Cluster Manager application runs up automatically (or else you can run it through the Start menu) for further step-by-step configuration in an easy to follow outofthebox To-do List.
Here are some tips for step b from above, for your developer cluster setup:
i) In the HPC Pack wizard, you will create one of the machines as the Head Node.
ii) In the HPC Pack wizard, the remainder machines will be created as the Compute Nodes.
iii) In Cluster Manager, click on "Configure your network" and choose topology 5 "All Nodes only on an Enterprise Network".
iv) In Cluster Manager, click on "Add compute nodes" and then select "Add compute nodes that have already been configured".
v) In Cluster Manager, click "Change the role of the head node" and also make it a WCF Broker Node.
vi) In Cluster Manager, "Validate your cluster" under Diagnostics.
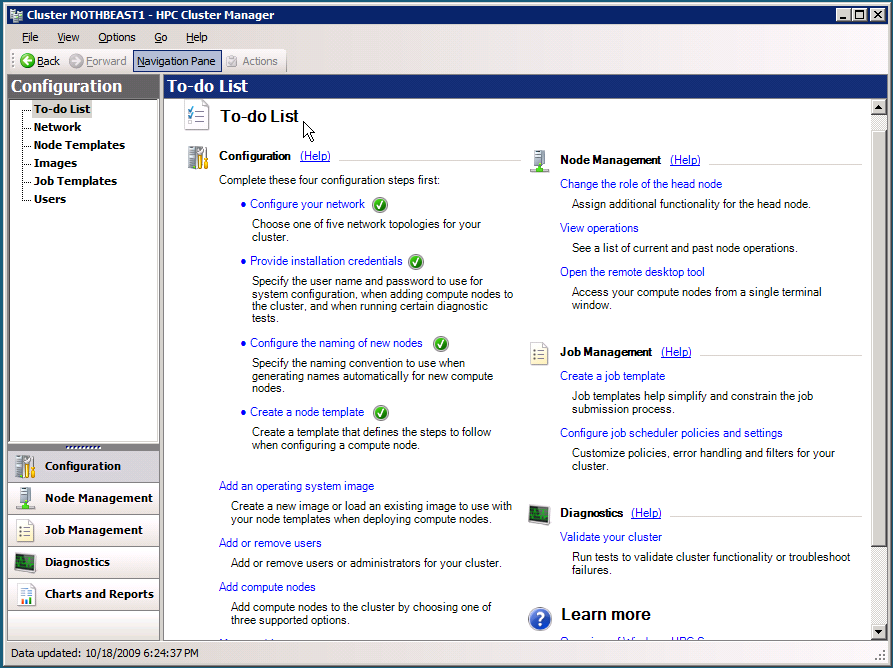
It may be useful to cross-reference the text above with the following screenshot of HPC Cluster Manager
Now that your cluster is installed, you need to set up your development machine (x86 or x64) for developing on this cluster. Here are the things you need to install:
1. Visual Studio 2010
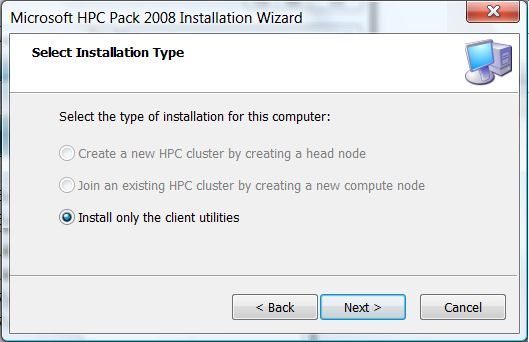
2. HPC Pack 2008. This is essentially the same msi you installed on the server (step b above), but here you will choose the 3rd option Client Utilities (which will probably be your only enabled option as per my screenshot further above).
3. HPC Pack 2008 SDK. This allows writing client applications that interact with the Job Scheduler running on the Head Node. MSDN has a dedicated page to the HPC SDK.
4. (optional) Install the separate MPI Project Template, for VS2010.
You are now ready to develop your cluster applications on your development machine and to debug/deploy them on your cluster. More on that in future blog posts.